Kyocera KM-2550 Basic Guide - Page 76
Names of Parts, Placing Originals in the Document Processor, Original Table, Original Insert Guides
 |
View all Kyocera KM-2550 manuals
Add to My Manuals
Save this manual to your list of manuals |
Page 76 highlights
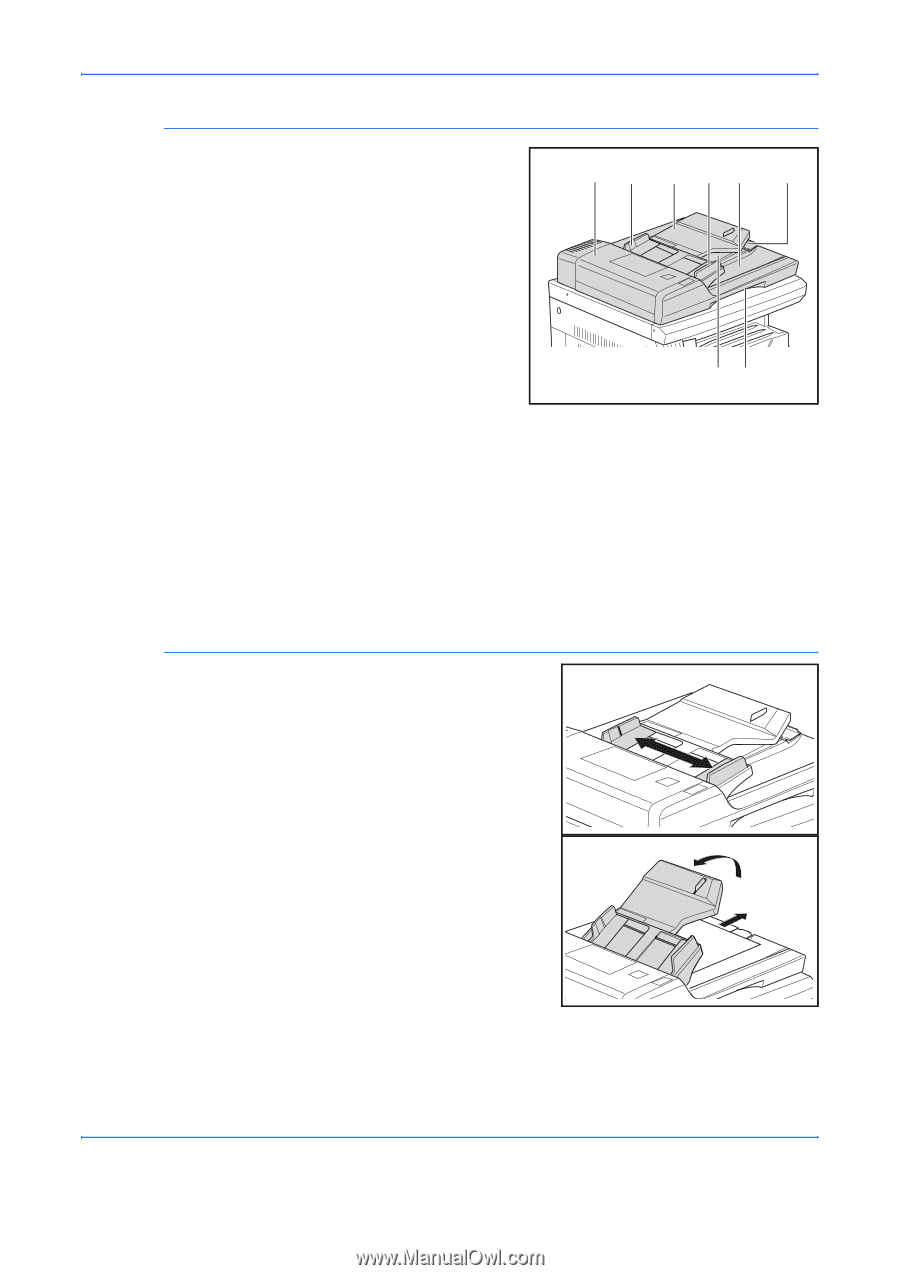
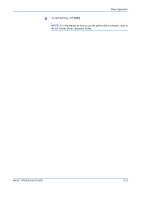
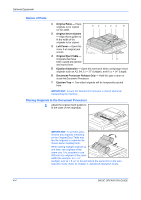
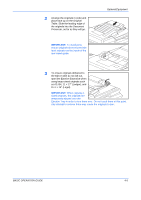
Optional Equipment Names of Parts 1 Original Table - Place originals to be copied on this table. 32 12 4 5 2 Original Insert Guides - Align these guides to fit the width of the originals to be copied. 3 Left Cover - Open this cover if an original jam occurs. 4 Original Eject Table - Originals that have been copied are ejected and stored here. 76 5 Ejection Extension - Open this extension when using larger sized originals such as A3, B4, 11 × 17" (Ledger), and 8 1/2 × 14" (Legal). 6 Document Processor Release Grip - Hold this grip to open or close the Document Processor. 7 Ejection Tray - Two-sided originals will be temporarily ejected here. IMPORTANT: Ensure the Document Processor is closed whenever transporting the machine. Placing Originals in the Document Processor 1 Adjust the original insert guides to fit the width of the original(s). IMPORTANT: To prevent jams, remove any originals remaining on the Original Eject Table and fan the originals to separate the sheets before loading them. When setting multiple originals at one time, use originals of the same size. It is, possible to use different size originals of the same width (for example, 11 × 17" (Ledger) and 11 × 8 1/2" or A4 and A3) at the same time in the auto selection mode. Refer to Chapter 1, Advanced Operation Guide. 4-4 BASIC OPERATION GUIDE
-
 1
1 -
2
-
3
-
4
-
5
-
6
-
7
-
8
-
9
-
10
-
11
-
12
-
13
-
14
-
15
-
16
-
17
-
18
-
19
-
20
-
21
-
22
-
23
-
24
-
25
-
26
-
27
-
28
-
29
-
30
-
31
-
32
-
33
-
34
-
35
-
36
-
37
-
38
-
39
-
40
-
41
-
42
-
43
-
44
-
45
-
46
-
47
-
48
-
49
-
50
-
51
-
52
-
53
-
54
-
55
-
56
-
57
-
58
-
59
-
60
-
61
-
62
-
63
-
64
-
65
-
66
-
67
-
68
-
69
-
70
-
 71
71 -
 72
72 -
 73
73 -
 74
74 -
 75
75 -
 76
76 -
 77
77 -
 78
78 -
 79
79 -
 80
80 -
 81
81 -
82
-
83
-
84
-
85
-
86
-
87
-
88
-
89
-
90
-
91
-
92
-
93
-
94
-
95
-
96
-
97
-
98
-
99
-
100
-
101
-
102
-
103
-
104
-
105
-
106
-
107
-
108
-
109
-
110
-
111
-
112
-
113
-
114
-
115
-
116
-
117
-
118
-
119
-
120
-
121
-
122
-
123
-
124
-
125
-
126
-
127
-
128
-
129
-
130
-
131
-
132
-
133
-
134
 |
 |