Kyocera TASKalfa Pro 15000c Pro 15000c Printer Driver User Guide - Page 17
Upgrade, Upgrading drivers and utilities, Maintenance, Printer name, Share the printer
 |
View all Kyocera TASKalfa Pro 15000c manuals
Add to My Manuals
Save this manual to your list of manuals |
Page 17 highlights
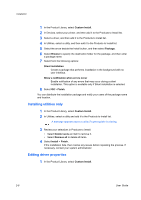
Installation 2 In Devices, select your printer, and then add it to the Products to Install list. 3 In Drivers, select a driver and then add it to the Products to Install list. 4 In Products to Install, select Edit beside your printer, and then review or modify the following options: If more than one drivers are selected, then select each tab to view the options. • Printer name • Share the printer If this option is selected, then specify a share name. • Set as default printer 5 Select OK. Upgrade The installer can detect outdated driver or utility components on your computer. You can select components and upgrade them to the most recent version. If there are upgrades available, a list appears when you select Upgrade. This feature is not available if the printer has active connections or is shared in Printer properties. In a client/server environment, you can only upgrade older components from the server but not from a client computer. For more information, contact your printer dealer. Upgrading drivers and utilities 1 In the Product Library, select Upgrade. 2 Select the drivers and utilities to be upgraded on your computer. 3 Select Upgrade > Finish. Maintenance Access any of the following options: Some options may not be applicable to your printer. Optional Printer Components Expand functionality with Help modules in other languages, common printer profiles, and plug-in modules. Printer Driver 2-7
-
 1
1 -
2
-
3
-
4
-
5
-
6
-
7
-
8
-
9
-
10
-
11
-
 12
12 -
 13
13 -
 14
14 -
 15
15 -
 16
16 -
 17
17 -
 18
18 -
 19
19 -
 20
20 -
 21
21 -
 22
22 -
23
-
24
-
25
-
26
-
27
-
28
-
29
-
30
-
31
-
32
-
33
-
34
-
35
-
36
-
37
-
38
-
39
-
40
-
41
-
42
-
43
-
44
-
45
-
46
-
47
-
48
-
49
-
50
-
51
-
52
-
53
-
54
-
55
-
56
-
57
-
58
-
59
-
60
-
61
-
62
-
63
-
64
-
65
-
66
-
67
-
68
-
69
-
70
-
71
-
72
-
73
-
74
-
75
-
76
-
77
-
78
-
79
-
80
-
81
-
82
-
83
-
84
-
85
-
86
-
87
-
88
-
89
-
90
-
91
-
92
-
93
-
94
-
95
-
96
-
97
-
98
-
99
-
100
-
101
-
102
-
103
-
104
-
105
-
106
-
107
-
108
-
109
-
110
-
111
-
112
-
113
-
114
-
115
-
116
-
117
-
118
-
119
-
120
-
121
-
122
-
123
-
124
-
125
-
126
-
127
-
128
 |
 |
