LG N1A1DD1 Owner's Manual - Page 77
Replace a Backup Disc
 |
View all LG N1A1DD1 manuals
Add to My Manuals
Save this manual to your list of manuals |
Page 77 highlights
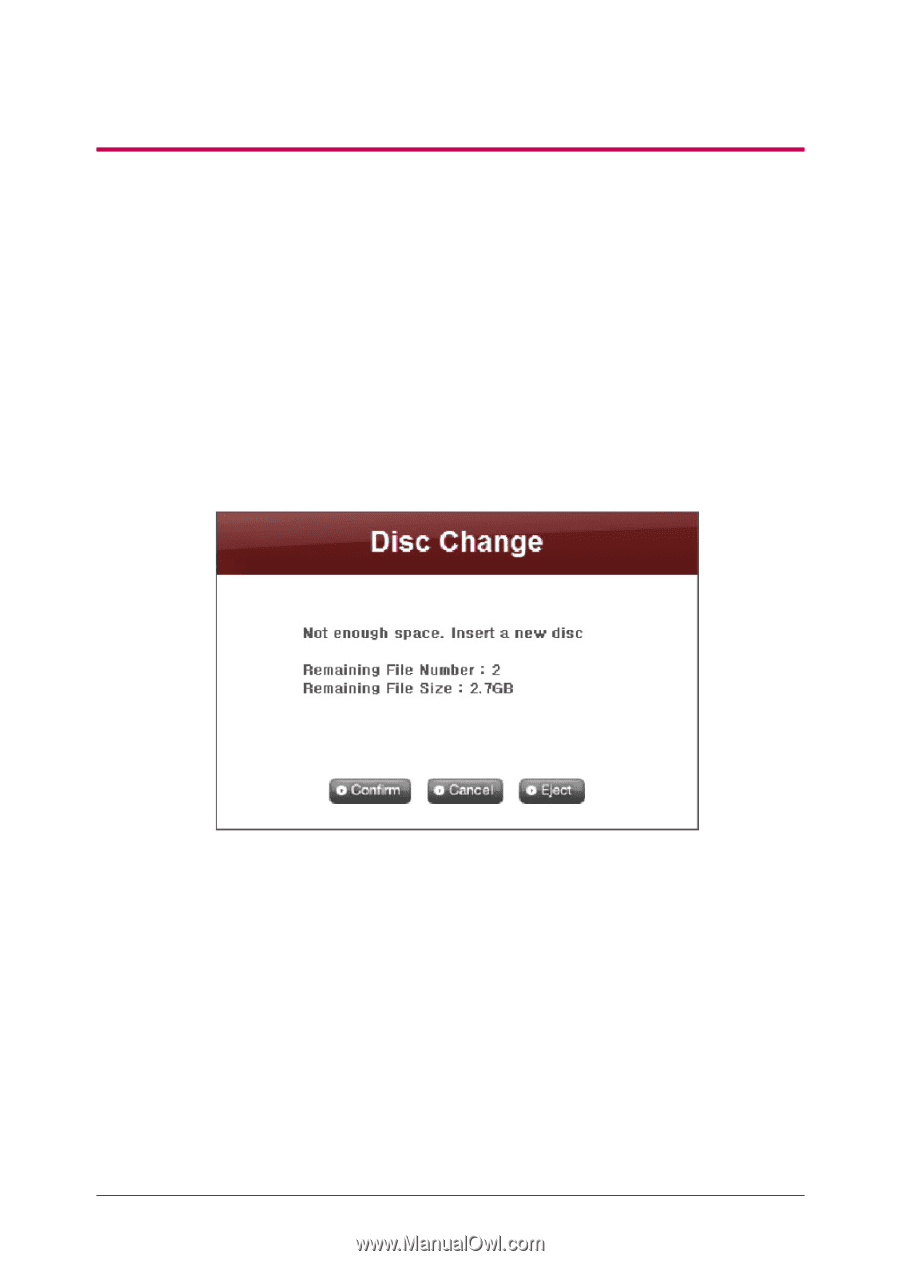
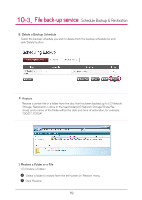
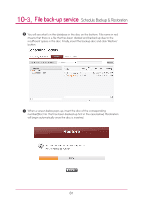
10-3. File back-up service Schedule Backup & Restoration 6. Replace a Backup Disc If there is not enough free space in the disc from frequent scheduled backups, you can replace the disc and proceed. If the size of the data to be backed up exceeds the free space of the disc, the data as much as the free space will be backed up. When the backup is complete, 'Disc Change' screen will pop up and the trey will open automatically. Check the size of the remaining files to be backed up on 'Disc Change' screen, insert a new disc and proceed with backup. In case of using a disk previously used, you can format the disk and proceed with backup, following the directions. If the size of the file to be backed up exceeds free space of the disk, you can divide the files to back them up consecutively in a number of discs. In such a case, restoration will be done by inserting two discs consecutively as well. Replace with writable media and click 'Confirm' button. Click 'Cancel' button to back up rest of files later. When backing up rest of files later, you can click 'Backup' button on 'Scheduling Backup List' menu and back them up consecutively, or insert a writable disk for automatic backup at a preset time. Screen below will pop up when you click 'Backup' button for consecutive backups. The file in red is a file which had been divided, due to insufficient size of the writable disc, and then backed up. The file above it is a file that has been completely backed up, and the file below it is a file to be backed up. Click 'Confirm' button to proceed with backup in the previous setting. 77
-
 1
1 -
2
-
3
-
4
-
5
-
6
-
7
-
8
-
9
-
10
-
11
-
12
-
13
-
14
-
15
-
16
-
17
-
18
-
19
-
20
-
21
-
22
-
23
-
24
-
25
-
26
-
27
-
28
-
29
-
30
-
31
-
32
-
33
-
34
-
35
-
36
-
37
-
38
-
39
-
40
-
41
-
42
-
43
-
44
-
45
-
46
-
47
-
48
-
49
-
50
-
51
-
52
-
53
-
54
-
55
-
56
-
57
-
58
-
59
-
60
-
61
-
62
-
63
-
64
-
65
-
66
-
67
-
68
-
69
-
70
-
71
-
 72
72 -
 73
73 -
 74
74 -
 75
75 -
 76
76 -
 77
77 -
 78
78 -
 79
79 -
 80
80 -
 81
81 -
 82
82 -
83
-
84
-
85
-
86
-
87
-
88
-
89
-
90
-
91
-
92
-
93
-
94
-
95
-
96
-
97
-
98
-
99
-
100
-
101
-
102
-
103
-
104
-
105
-
106
-
107
-
108
-
109
-
110
-
111
-
112
 |
 |