Lenovo NetVista A22 Hardware Maintenance Manual (HMM) for NetVista 2254, 2256, - Page 27
Installing Options, Locating the connectors on the front of your computer
 |
View all Lenovo NetVista A22 manuals
Add to My Manuals
Save this manual to your list of manuals |
Page 27 highlights
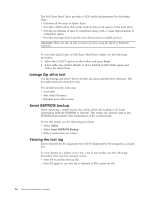
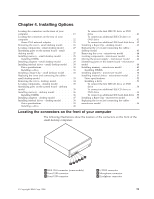
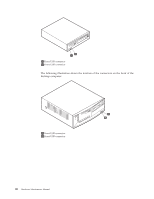
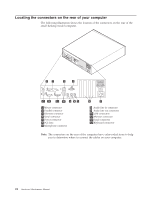
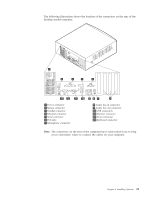
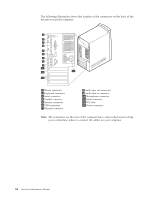
Chapter 4. Installing Options Locating the connectors on the front of your computer 19 Locating the connectors on the rear of your computer 22 Home PNA network adapter 25 Removing the cover - small desktop model . . . . 26 Locating components - small desktop model . . . 27 Identifying parts on the system board - small desktop model 27 Installing memory - small desktop model . . . . 28 Installing DIMMs 28 Installing adapters - small desktop model . . . . 29 Installing internal drives - small desktop model . . 30 Drive specifications 30 Installing a drive 31 Installing a Rope Clip - small desktop model . . . 33 Replacing the cover and connecting the cables small desktop model 33 Removing the cover - desktop model 34 Locating components - desktop model . . . . . 35 Identifying parts on the system board - desktop model 35 Installing memory - desktop model 36 Installing DIMMs 36 Installing adapters - desktop model 37 Installing internal drives - desktop model . . . . 38 Drive specifications 39 Installing a drive 40 To connect the first IDE CD drive or DVD drive 41 To connect an additional IDE CD drive or DVD drive 42 To connect an additional IDE hard disk drive 42 Installing a Rope Clip - desktop model . . . . . 42 Replacing the cover and connecting the cables desktop model 43 Removing the cover - microtower model . . . . 44 Locating components - microtower model . . . . 46 Moving the power supply - microtower model . . 46 Identifying parts on the system board - microtower model 48 Installing memory - microtower model . . . . . 49 Installing DIMMs 49 Installing adapters - microtower model . . . . . 50 Installing internal drives - microtower model . . . 51 Drive specifications 52 Installing a drive 53 To connect the first IDE CD drive or DVD drive 54 To connect an additional IDE CD drive or DVD drive 55 To connect an additional IDE hard disk drive 55 Installing a Rope Clip - microtower model . . . . 55 Replacing the cover and connecting the cables microtower model 56 Locating the connectors on the front of your computer The following illustrations show the location of the connectors on the front of the small desktop computers. 1394 1 IEEE 1394 connector (some models) 2 Front USB connector 3 Front USB connector 4 S/PDIF connector 5 Microphone connector 6 Headphone connector © Copyright IBM Corp. 2000 19
-
 1
1 -
2
-
3
-
4
-
5
-
6
-
7
-
8
-
9
-
10
-
11
-
12
-
13
-
14
-
15
-
16
-
17
-
18
-
19
-
20
-
21
-
 22
22 -
 23
23 -
 24
24 -
 25
25 -
 26
26 -
 27
27 -
 28
28 -
 29
29 -
 30
30 -
 31
31 -
 32
32 -
33
-
34
-
35
-
36
-
37
-
38
-
39
-
40
-
41
-
42
-
43
-
44
-
45
-
46
-
47
-
48
-
49
-
50
-
51
-
52
-
53
-
54
-
55
-
56
-
57
-
58
-
59
-
60
-
61
-
62
-
63
-
64
-
65
-
66
-
67
-
68
-
69
-
70
-
71
-
72
-
73
-
74
-
75
-
76
-
77
-
78
-
79
-
80
-
81
-
82
-
83
-
84
-
85
-
86
-
87
-
88
-
89
-
90
-
91
-
92
-
93
-
94
-
95
-
96
-
97
-
98
-
99
-
100
-
101
-
102
-
103
-
104
-
105
-
106
-
107
-
108
-
109
-
110
-
111
-
112
-
113
-
114
-
115
-
116
-
117
-
118
-
119
-
120
-
121
-
122
-
123
-
124
-
125
-
126
-
127
-
128
-
129
-
130
-
131
-
132
-
133
-
134
-
135
-
136
-
137
-
138
-
139
-
140
-
141
-
142
-
143
-
144
-
145
-
146
-
147
-
148
-
149
-
150
-
151
-
152
-
153
-
154
-
155
-
156
-
157
-
158
-
159
-
160
-
161
-
162
-
163
-
164
-
165
-
166
-
167
-
168
-
169
-
170
-
171
-
172
-
173
-
174
-
175
-
176
-
177
-
178
-
179
-
180
-
181
-
182
-
183
-
184
-
185
-
186
-
187
-
188
-
189
-
190
-
191
-
192
-
193
-
194
-
195
-
196
-
197
-
198
-
199
-
200
-
201
-
202
-
203
-
204
-
205
-
206
-
207
-
208
-
209
-
210
-
211
-
212
-
213
-
214
-
215
-
216
-
217
-
218
-
219
-
220
-
221
-
222
-
223
-
224
-
225
-
226
-
227
-
228
-
229
-
230
-
231
-
232
-
233
-
234
-
235
-
236
-
237
-
238
-
239
-
240
-
241
-
242
-
243
-
244
-
245
-
246
-
247
-
248
-
249
-
250
-
251
-
252
 |
 |