Lenovo NetVista A22 Hardware Maintenance Manual (HMM) for NetVista 2254, 2256, - Page 69
Replacing a processor - Small Desktop Model, Attention
 |
View all Lenovo NetVista A22 manuals
Add to My Manuals
Save this manual to your list of manuals |
Page 69 highlights
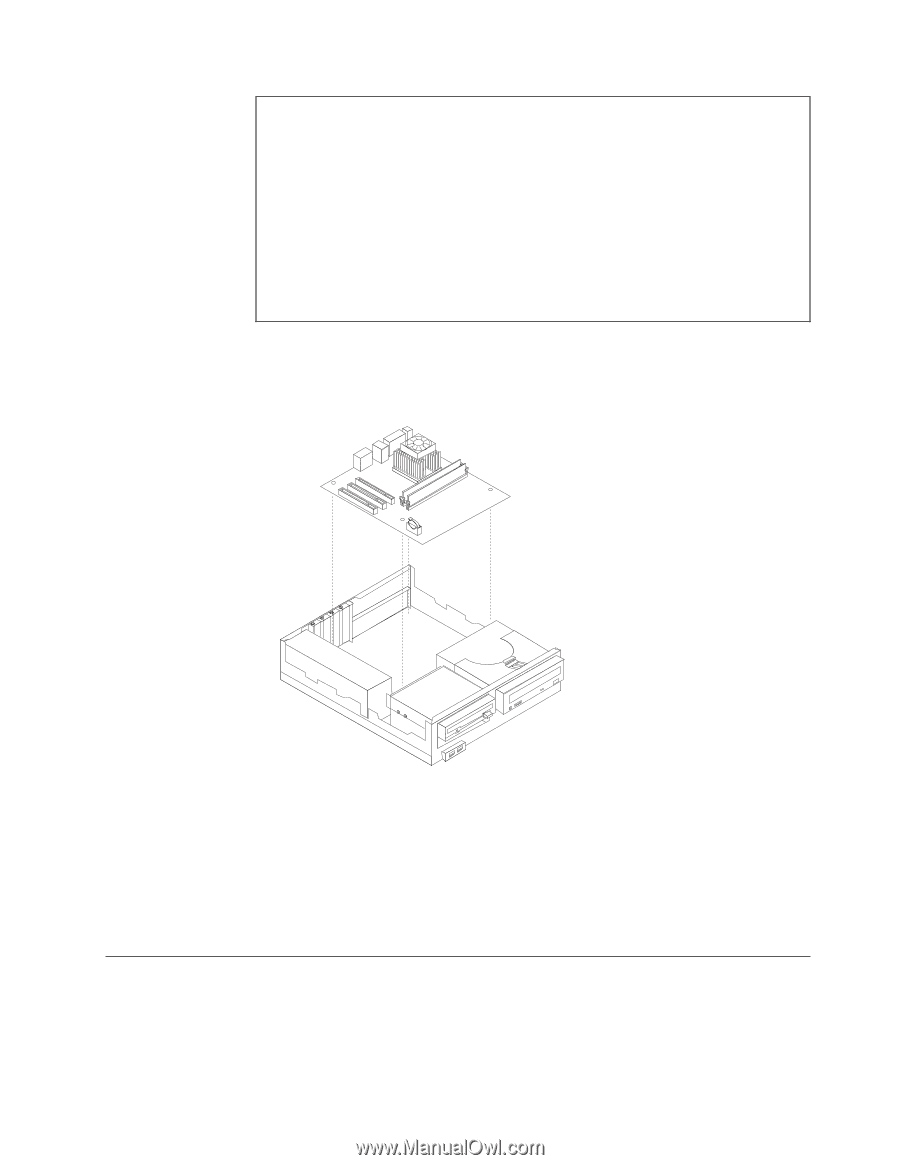
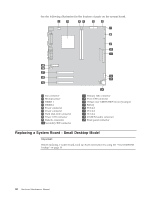
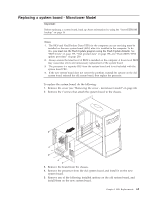
Notes: 1. The BIOS and Vital Product Data (VPD) for the computer you are servicing must be installed on the new system board (FRU) after it is installed in the computer. To do this, you must run the Flash Update program using the Flash Update diskette. See "BIOS levels" on page 199, "Vital product data" on page 198, and "Flash (BIOS/VPD) update procedure" on page 200. 2. Always ensure the latest level of BIOS is installed on the computer. A down level BIOS may cause false errors and unnecessary replacement of the system board. 3. The processor is a separate FRU from the system board and is not included with the system board FRU. 4. If the new system board does not correct the problem, reinstall the options on the old system board, reinstall the old system board, then replace the processor. 1. Remove the cover. See "Removing the cover - small desktop model" on page 26. 2. Remove the 4 screws that attach the system board to the chassis. **This graphic is incorrect. Correct graphic is in process.** 3. Remove the board from the chassis. 4. Remove the processor from the old system board and install it on the new system board. 5. Remove any of the following installed options on the old system board, and install them on the new system board. v Memory modules 6. Ensure that the new system board jumper settings match the old system board jumper settings. Replacing a processor - Small Desktop Model Attention: When you handle ESD-sensitive devices, take precautions to avoid damage from static electricity. For details on handling these devices, see "Handling electrostatic discharge-sensitive devices" on page 210. 1. Review the safety precautions listed in "Safety information" on page 207. Chapter 5. FRU Replacements 61
-
 1
1 -
2
-
3
-
4
-
5
-
6
-
7
-
8
-
9
-
10
-
11
-
12
-
13
-
14
-
15
-
16
-
17
-
18
-
19
-
20
-
21
-
22
-
23
-
24
-
25
-
26
-
27
-
28
-
29
-
30
-
31
-
32
-
33
-
34
-
35
-
36
-
37
-
38
-
39
-
40
-
41
-
42
-
43
-
44
-
45
-
46
-
47
-
48
-
49
-
50
-
51
-
52
-
53
-
54
-
55
-
56
-
57
-
58
-
59
-
60
-
61
-
62
-
63
-
 64
64 -
 65
65 -
 66
66 -
 67
67 -
 68
68 -
 69
69 -
 70
70 -
 71
71 -
 72
72 -
 73
73 -
 74
74 -
75
-
76
-
77
-
78
-
79
-
80
-
81
-
82
-
83
-
84
-
85
-
86
-
87
-
88
-
89
-
90
-
91
-
92
-
93
-
94
-
95
-
96
-
97
-
98
-
99
-
100
-
101
-
102
-
103
-
104
-
105
-
106
-
107
-
108
-
109
-
110
-
111
-
112
-
113
-
114
-
115
-
116
-
117
-
118
-
119
-
120
-
121
-
122
-
123
-
124
-
125
-
126
-
127
-
128
-
129
-
130
-
131
-
132
-
133
-
134
-
135
-
136
-
137
-
138
-
139
-
140
-
141
-
142
-
143
-
144
-
145
-
146
-
147
-
148
-
149
-
150
-
151
-
152
-
153
-
154
-
155
-
156
-
157
-
158
-
159
-
160
-
161
-
162
-
163
-
164
-
165
-
166
-
167
-
168
-
169
-
170
-
171
-
172
-
173
-
174
-
175
-
176
-
177
-
178
-
179
-
180
-
181
-
182
-
183
-
184
-
185
-
186
-
187
-
188
-
189
-
190
-
191
-
192
-
193
-
194
-
195
-
196
-
197
-
198
-
199
-
200
-
201
-
202
-
203
-
204
-
205
-
206
-
207
-
208
-
209
-
210
-
211
-
212
-
213
-
214
-
215
-
216
-
217
-
218
-
219
-
220
-
221
-
222
-
223
-
224
-
225
-
226
-
227
-
228
-
229
-
230
-
231
-
232
-
233
-
234
-
235
-
236
-
237
-
238
-
239
-
240
-
241
-
242
-
243
-
244
-
245
-
246
-
247
-
248
-
249
-
250
-
251
-
252
 |
 |