Lenovo ThinkCentre Edge 72 Hardware Maintenance Manual (HMM) for ThinkCentre E - Page 113
Installing or removing the rear WiFi antenna
 |
View all Lenovo ThinkCentre Edge 72 manuals
Add to My Manuals
Save this manual to your list of manuals |
Page 113 highlights
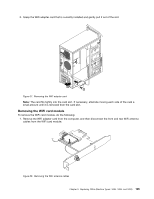
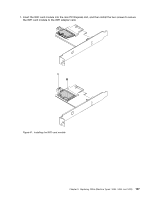
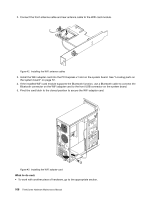
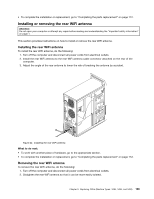
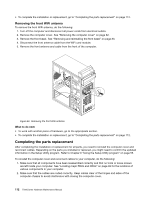
• To complete the installation or replacement, go to "Completing the parts replacement" on page 112. Installing or removing the rear WiFi antenna Attention: Do not open your computer or attempt any repair before reading and understanding the "Important safety information" on page 1. This section provides instructions on how to install or remove the rear WiFi antenna. Installing the rear WiFi antenna To install the rear WiFi antenna, do the following: 1. Turn off the computer and disconnect all power cords from electrical outlets. 2. Install the rear WiFi antenna to the rear WiFi antenna cable connector attached on the rear of the computer. 3. Adjust the angle of the rear antenna to lower the risk of breaking the antenna by accident. Figure 44. Installing the rear WiFi antenna What to do next: • To work with another piece of hardware, go to the appropriate section. • To complete the installation or replacement, go to "Completing the parts replacement" on page 112. Removing the rear WiFi antenna To remove the rear WiFi antenna, do the following: 1. Turn off the computer and disconnect all power cords from electrical outlets. 2. Straighten the rear WiFi antenna so that it can be more easily twisted. Chapter 9. Replacing FRUs (Machine Types: 3484, 3485, and 3492) 109
-
 1
1 -
2
-
3
-
4
-
5
-
6
-
7
-
8
-
9
-
10
-
11
-
12
-
13
-
14
-
15
-
16
-
17
-
18
-
19
-
20
-
21
-
22
-
23
-
24
-
25
-
26
-
27
-
28
-
29
-
30
-
31
-
32
-
33
-
34
-
35
-
36
-
37
-
38
-
39
-
40
-
41
-
42
-
43
-
44
-
45
-
46
-
47
-
48
-
49
-
50
-
51
-
52
-
53
-
54
-
55
-
56
-
57
-
58
-
59
-
60
-
61
-
62
-
63
-
64
-
65
-
66
-
67
-
68
-
69
-
70
-
71
-
72
-
73
-
74
-
75
-
76
-
77
-
78
-
79
-
80
-
81
-
82
-
83
-
84
-
85
-
86
-
87
-
88
-
89
-
90
-
91
-
92
-
93
-
94
-
95
-
96
-
97
-
98
-
99
-
100
-
101
-
102
-
103
-
104
-
105
-
106
-
107
-
 108
108 -
 109
109 -
 110
110 -
 111
111 -
 112
112 -
 113
113 -
 114
114 -
 115
115 -
 116
116 -
 117
117 -
 118
118 -
119
-
120
-
121
-
122
-
123
-
124
-
125
-
126
-
127
-
128
-
129
-
130
-
131
-
132
-
133
-
134
-
135
-
136
-
137
-
138
-
139
-
140
-
141
-
142
-
143
-
144
-
145
-
146
-
147
-
148
-
149
-
150
-
151
-
152
-
153
-
154
-
155
-
156
-
157
-
158
-
159
-
160
-
161
-
162
-
163
-
164
-
165
-
166
-
167
-
168
-
169
-
170
 |
 |
