Lenovo ThinkCentre M72z Hardware Maintenance Manual (HMM) for ThinkCentre M72z - Page 115
Completing the parts replacement
 |
View all Lenovo ThinkCentre M72z manuals
Add to My Manuals
Save this manual to your list of manuals |
Page 115 highlights
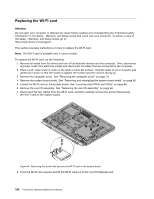
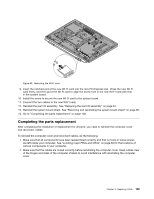
Figure 49. Removing the WI-FI card 9. Insert the notched end of the new WI-FI card into the mini PCI Express slot. Press the new WI-FI card firmly, and then pivot the WI-FI card to align the screw hole in the new WI-FI card with that in the system board. 10. Install the screw to secure the new WI-FI card to the system board. 11. Connect the two cables to the new WI-FI card. 12. Reinstall the rear I/O assembly. See "Replacing the rear I/O assembly" on page 84. 13. Reinstall the system board shield. See "Removing and reinstalling the system board shield" on page 86. 14. Go to "Completing the parts replacement" on page 109. Completing the parts replacement After completing the installation or replacement for all parts, you need to reinstall the computer cover and reconnect cables. To reinstall the computer cover and reconnect cables, do the following: 1. Make sure that all components have been reassembled correctly and that no tools or loose screws are left inside your computer. See "Locating major FRUs and CRUs" on page 66 for the locations of various components in your computer. 2. Make sure that the cables are routed correctly before reinstalling the computer cover. Keep cables clear of the hinges and sides of the computer chassis to avoid interference with reinstalling the computer cover. Chapter 9. Replacing FRUs 109
-
 1
1 -
2
-
3
-
4
-
5
-
6
-
7
-
8
-
9
-
10
-
11
-
12
-
13
-
14
-
15
-
16
-
17
-
18
-
19
-
20
-
21
-
22
-
23
-
24
-
25
-
26
-
27
-
28
-
29
-
30
-
31
-
32
-
33
-
34
-
35
-
36
-
37
-
38
-
39
-
40
-
41
-
42
-
43
-
44
-
45
-
46
-
47
-
48
-
49
-
50
-
51
-
52
-
53
-
54
-
55
-
56
-
57
-
58
-
59
-
60
-
61
-
62
-
63
-
64
-
65
-
66
-
67
-
68
-
69
-
70
-
71
-
72
-
73
-
74
-
75
-
76
-
77
-
78
-
79
-
80
-
81
-
82
-
83
-
84
-
85
-
86
-
87
-
88
-
89
-
90
-
91
-
92
-
93
-
94
-
95
-
96
-
97
-
98
-
99
-
100
-
101
-
102
-
103
-
104
-
105
-
106
-
107
-
108
-
109
-
 110
110 -
 111
111 -
 112
112 -
 113
113 -
 114
114 -
 115
115 -
 116
116 -
 117
117 -
 118
118 -
 119
119 -
 120
120 -
121
-
122
-
123
-
124
-
125
-
126
 |
 |
