Lexmark 4076 Execjet II Service Manual - Page 43
Adjustments, Bi-directional Alignment Adjustment
 |
View all Lexmark 4076 Execjet II manuals
Add to My Manuals
Save this manual to your list of manuals |
Page 43 highlights
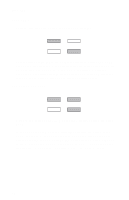
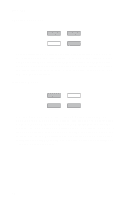
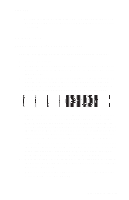
4076-0XX • Be extra careful in working with ESD-sensitive parts when cold- weather heating is used because low humidity increases static electricity. Adjustments Bi-directional Alignment Adjustment Perform this adjustment with the black print cartridge installed. 1. Turn off the printer. 2. Hold down the Install Print Cartridge button and the Line Feed Button, then turn on the printer. Release the buttons when all the lights go out. 3. A page loads and the bi-directional alignment pattern prints. The pattern consists of three lines of vertical bars. The bars are aligned when the adjustment is correct. The following sample requires the center vertical bars to be moved to the right. 4. The center bars can be coarse aligned or fine aligned. Coarse alignment moves the center bar 1/300" (.085mm). Fine alignment moves the center bar 1/1200" (.021mm). To perform the coarse alignment, open the operator panel cover and use the top two buttons to move the center bar. Press the left button to move the bar to the left. Press the right button to move the bar to the right. Each time you press the button the three lines will print. 5. To fine align the bars, close the operator panel cover and use the two bottom buttons. Press the left button to move the center bar to the left. Press the right button to move the bar to the right. Each time you press a button the three lines will print. 6. When the alignment is correct, press the Draft button to switch to the draft mode. Follow the same procedure as above to align the bars in the draft mode. 7. When you complete the adjustment and turn off the printer the settings will be saved in NVRAM. Repair Information 31
-
 1
1 -
2
-
3
-
4
-
5
-
6
-
7
-
8
-
9
-
10
-
11
-
12
-
13
-
14
-
15
-
16
-
17
-
18
-
19
-
20
-
21
-
22
-
23
-
24
-
25
-
26
-
27
-
28
-
29
-
30
-
31
-
32
-
33
-
34
-
35
-
36
-
37
-
 38
38 -
 39
39 -
 40
40 -
 41
41 -
 42
42 -
 43
43 -
 44
44 -
 45
45 -
 46
46 -
 47
47 -
 48
48 -
49
-
50
-
51
-
52
-
53
-
54
-
55
-
56
-
57
-
58
-
59
-
60
-
61
-
62
-
63
-
64
-
65
-
66
-
67
-
68
-
69
-
70
-
71
-
72
-
73
-
74
-
75
-
76
-
77
-
78
-
79
-
80
-
81
-
82
-
83
-
84
-
85
-
86
-
87
-
88
-
89
 |
 |