Lexmark 4076 Execjet II Service Manual - Page 53
Outside Idler Gears Removal, Paper Ejectors Removal, Paper Guide Removal, ing from the right.
 |
View all Lexmark 4076 Execjet II manuals
Add to My Manuals
Save this manual to your list of manuals |
Page 53 highlights
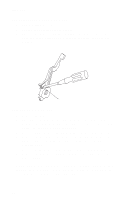
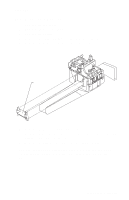
4076-0XX Outside Idler Gears Removal 1. Remove the top cover. 2. Disconnect the print head cables from the system board. You may have to open the print head cable connectors on the system board first, then disconnect the cables. 3. Each gear is latched in place. Push up the latch and remove the gear from the side frame stud by pulling the gear from the bottom. Paper Ejectors Removal 1. Remove the top cover. 2. Pivot the paper ejector pusher toward the front then pull it to remove the paper ejector from the shaft. 3. Unsnap the paper ejectors from the middle frame. Paper Feed Motor Removal 1. Remove the top cover. 2. Disconnect the paper feed motor from the system board. 3. Remove the two mounting screws or rotate the paper feed motor counter-clockwise to remove it from the right side frame. Paper Guide Removal 1. Remove the top cover. 2. Remove the auto sheet feed. 3. Disconnect the print head cables from the system board. You may have to open the print head cable connectors on the system board first, then disconnect the cables. 4. Pull the ends of the print head cables into the machine, then remove the cables from the 4 retainers in the paper guide starting from the right. 5. Disengage the left paper guide latch by carefully moving the rear of the left side frame to the left. 6. Disengage the right side of the paper guide from the latch and lift it from the machine. Note: When you reinstall the paper guide, be sure the front edge goes under the rear of the carrier guide. If the paper guide is on top of the carrier guide, push down the front, bottom edge. It will snap under the carrier guide. Repair Information 41
-
 1
1 -
2
-
3
-
4
-
5
-
6
-
7
-
8
-
9
-
10
-
11
-
12
-
13
-
14
-
15
-
16
-
17
-
18
-
19
-
20
-
21
-
22
-
23
-
24
-
25
-
26
-
27
-
28
-
29
-
30
-
31
-
32
-
33
-
34
-
35
-
36
-
37
-
38
-
39
-
40
-
41
-
42
-
43
-
44
-
45
-
46
-
47
-
 48
48 -
 49
49 -
 50
50 -
 51
51 -
 52
52 -
 53
53 -
 54
54 -
 55
55 -
 56
56 -
 57
57 -
 58
58 -
59
-
60
-
61
-
62
-
63
-
64
-
65
-
66
-
67
-
68
-
69
-
70
-
71
-
72
-
73
-
74
-
75
-
76
-
77
-
78
-
79
-
80
-
81
-
82
-
83
-
84
-
85
-
86
-
87
-
88
-
89
 |
 |
