Lexmark 4076 Execjet II Service Manual - Page 47
Carrier Transport Belt Removal, Carrier Guide Removal
 |
View all Lexmark 4076 Execjet II manuals
Add to My Manuals
Save this manual to your list of manuals |
Page 47 highlights
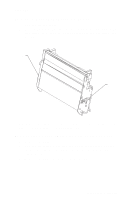
4076-0XX Carrier Transport Belt Removal 1. Remove the top cover. 2. Move the carrier in line with the opening in the carrier transport motor frame. 3. Reach through the opening and pull the belt from the carrier. 4. Remove the belt from the carrier transport motor pulley. 5. Remove the belt from the idler pulley and pull it through the opening in the left side frame. Note: When you reinstall the belt be sure to insert the bottom of the belt into BOTH the lower and upper belt grips on the carrier. DO NOT INSERT THE TOP OF THE BELT INTO THE TOP GRIP. Carrier Guide Removal You may remove the carrier guide without removing the covers if you carefully follow this procedure. 1. Open and remove the access cover. 2. Remove the print cartridge. 3. With the carrier centered, carefully release the 2 carrier guide rod latches and lift the shaft slightly. 4. Unlatch the 2 carrier guide latches by pushing to the rear. 5. Gently push the carrier to the extreme right and remove the car- rier guide. When you reinstall the carrier guide, be sure the fingers on the bottom of the carrier engage the groove on the carrier guide before you snap the carrier guide rod down. Carrier Transport Motor Removal 1. Remove the top cover. 2. Disconnect the carrier transport motor (J6) from the system board. 3. Remove the 2 motor mounting screws and remove the motor. Repair Information 35
-
 1
1 -
2
-
3
-
4
-
5
-
6
-
7
-
8
-
9
-
10
-
11
-
12
-
13
-
14
-
15
-
16
-
17
-
18
-
19
-
20
-
21
-
22
-
23
-
24
-
25
-
26
-
27
-
28
-
29
-
30
-
31
-
32
-
33
-
34
-
35
-
36
-
37
-
38
-
39
-
40
-
41
-
 42
42 -
 43
43 -
 44
44 -
 45
45 -
 46
46 -
 47
47 -
 48
48 -
 49
49 -
 50
50 -
 51
51 -
 52
52 -
53
-
54
-
55
-
56
-
57
-
58
-
59
-
60
-
61
-
62
-
63
-
64
-
65
-
66
-
67
-
68
-
69
-
70
-
71
-
72
-
73
-
74
-
75
-
76
-
77
-
78
-
79
-
80
-
81
-
82
-
83
-
84
-
85
-
86
-
87
-
88
-
89
 |
 |
