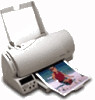
Lexmark 4076 Execjet II Service Manual - Page 49
End-of-forms Flag Removal, Exit Roller Assembly Removal, Eprom Removal, Feed Arm Assembly Removal
 |
View all Lexmark 4076 Execjet II manuals
Add to My Manuals
Save this manual to your list of manuals |
Page 49 highlights
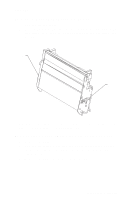
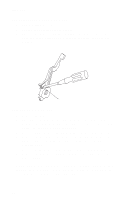
4076-0XX End-of-forms Flag Removal 1. Remove the top cover. 2. Remove the ASF. 3. Disconnect the print head cables from the system board. You may have to open the print head cable connectors on the system board first, then disconnect the cables 4. Disconnect connectors J4, J5, and J6 from the system board. 5. Remove the machine from the base. To do this, unlatch the 4 base frame latches. Lift the machine from the base and set it on its front with the bottom facing you. 5. Pivot the weighted end of the end-of-forms flag through the opening in the middle frame. 6. Lift the flag up and out of the machine. Exit Roller Assembly Removal 1. Remove the top cover. 2. Remove the carrier transport frame. 3. Pivot the paper ejector pusher toward the front then pull it to remove the paper ejector from the shaft. 4. Remove the bushing from the left end of the exit shaft. To do this, pull the tab and rotate the bushing. 5. Slide the exit roller to the left and lift it out of the machine. Eprom Removal 1. Remove the top cover. 2. Disconnect the print head cables from the system board. You may have to open the print head cable connectors on the system board first, then disconnect the cables. 3. Disconnect connectors J4, J5, and J6 from the system board. 4. Remove the machine from the base. To do this, push the frame latches out as you lift the machine from the base. Set the machine aside. 5. Gently pry the EPROM from the system board. Feed Arm Assembly Removal 1. Remove the top cover. 2. Remove the auto sheet feed. 3. Remove the C-clip from the center of the large gear and remove the feed arm assembly. Repair Information 37
-
 1
1 -
2
-
3
-
4
-
5
-
6
-
7
-
8
-
9
-
10
-
11
-
12
-
13
-
14
-
15
-
16
-
17
-
18
-
19
-
20
-
21
-
22
-
23
-
24
-
25
-
26
-
27
-
28
-
29
-
30
-
31
-
32
-
33
-
34
-
35
-
36
-
37
-
38
-
39
-
40
-
41
-
42
-
43
-
 44
44 -
 45
45 -
 46
46 -
 47
47 -
 48
48 -
 49
49 -
 50
50 -
 51
51 -
 52
52 -
 53
53 -
 54
54 -
55
-
56
-
57
-
58
-
59
-
60
-
61
-
62
-
63
-
64
-
65
-
66
-
67
-
68
-
69
-
70
-
71
-
72
-
73
-
74
-
75
-
76
-
77
-
78
-
79
-
80
-
81
-
82
-
83
-
84
-
85
-
86
-
87
-
88
-
89
 |
 |
