Lexmark 4076 Execjet II Service Manual - Page 58
System Board Removal, Hold down the Install Print Cartridge, Form Feed and Draft/Letter
 |
View all Lexmark 4076 Execjet II manuals
Add to My Manuals
Save this manual to your list of manuals |
Page 58 highlights
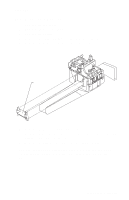
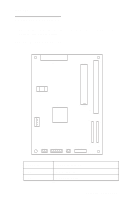
4076-0XX System Board Removal 1. Remove the top cover. 2. Disconnect the print head cables from the system board. You may have to open the print head cable connectors on the system board first, then disconnect the cables. 3. Disconnect connectors J4, J5, and J6 from the system board. 4. Remove the machine from the base. To do this, push the frame latches out as you lift the machine from the base. Set the machine aside. 4. Disconnect the power supply cable from the system board. 5. Remove the 6 system board mounting screws and remove the system board. 6. Check the bi-directional alignment adjustment. After replacing the system board, reset the printer to the factory defaults as follows: For countries using 8.5 x 11 paper: 1. Turn off the printer. 2. Hold down the Form Feed, Line Feed, and Install Ink Cartridge buttons and turn on the printer. Continue to hold down the buttons until all the lights are off. 3. Check the bi-directional alignment. For countries using A4 paper: 1. Turn off the printer. 2. Place a piece of paper in the manual feed slot to push the EOF flag out of the sensor. 3. Hold down the Install Print Cartridge, Form Feed and Draft/Letter Quality buttons and turn on the printer. Continue to hold down the buttons until all the lights are off. 4. Check the bi-directional alignment. 46
-
 1
1 -
2
-
3
-
4
-
5
-
6
-
7
-
8
-
9
-
10
-
11
-
12
-
13
-
14
-
15
-
16
-
17
-
18
-
19
-
20
-
21
-
22
-
23
-
24
-
25
-
26
-
27
-
28
-
29
-
30
-
31
-
32
-
33
-
34
-
35
-
36
-
37
-
38
-
39
-
40
-
41
-
42
-
43
-
44
-
45
-
46
-
47
-
48
-
49
-
50
-
51
-
52
-
 53
53 -
 54
54 -
 55
55 -
 56
56 -
 57
57 -
 58
58 -
 59
59 -
 60
60 -
 61
61 -
 62
62 -
 63
63 -
64
-
65
-
66
-
67
-
68
-
69
-
70
-
71
-
72
-
73
-
74
-
75
-
76
-
77
-
78
-
79
-
80
-
81
-
82
-
83
-
84
-
85
-
86
-
87
-
88
-
89
 |
 |
