Lexmark 6500 User Guide - Page 112
Sending a fax using the computer, Print, Properties, Enable fax, Include cover with fax, Notes
 |
View all Lexmark 6500 manuals
Add to My Manuals
Save this manual to your list of manuals |
Page 112 highlights
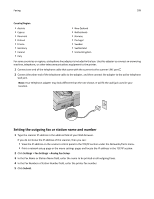
Faxing 112 Sending a fax using the computer The printer driver fax option allows you to "print to fax," where the scanner will send a queued document as a fax rather than print it. The fax option functions as a normal fax machine, but is controlled through the printer driver instead of the scanner control panel. 1 With a document open, click File > Print. 2 Select the printer, and then navigate to: Properties > Fax tab > Enable fax 3 Enter the recipient fax number in the "Fax number(s)" field. Fax numbers can be entered manually or by using the Phone Book feature. 4 If necessary, enter a prefix in the Dialing prefix field. 5 Select the appropriate paper size and page orientation. 6 If you want to include a cover page with the fax, then select Include cover page with fax, and enter the appropriate information. 7 Click OK. Notes: • The Fax option is available for use only with the PostScript driver or the Universal Fax Driver. For information on installing these drivers, see the Software and Documentation CD. • The Fax option must be configured and enabled in the PostScript driver under Configuration tab before it can be used. • If the Always display settings prior to faxing check box is selected, then you will be prompted to verify the recipient information before the fax is sent. If this check box is cleared, then the queued document will be sent automatically as a fax when you click OK on the Fax tab. Sending a fax using shortcuts Fax shortcuts are just like the speed dial numbers on a telephone or fax machine. A shortcut number (1-99999) can contain a single recipient or multiple recipients. 1 Load an original document facedown into the ADF or on the scanner glass. Note: Do not place postcards, photos, small items, transparencies, photo paper, or thin media (such as magazine clippings) into the ADF. Place these items on the scanner glass. 2 If you are loading a document into the ADF, then adjust the paper guides. 3 Press , and then enter the shortcut number using the keypad. 4 Touch Fax It.
-
 1
1 -
2
-
3
-
4
-
5
-
6
-
7
-
8
-
9
-
10
-
11
-
12
-
13
-
14
-
15
-
16
-
17
-
18
-
19
-
20
-
21
-
22
-
23
-
24
-
25
-
26
-
27
-
28
-
29
-
30
-
31
-
32
-
33
-
34
-
35
-
36
-
37
-
38
-
39
-
40
-
41
-
42
-
43
-
44
-
45
-
46
-
47
-
48
-
49
-
50
-
51
-
52
-
53
-
54
-
55
-
56
-
57
-
58
-
59
-
60
-
61
-
62
-
63
-
64
-
65
-
66
-
67
-
68
-
69
-
70
-
71
-
72
-
73
-
74
-
75
-
76
-
77
-
78
-
79
-
80
-
81
-
82
-
83
-
84
-
85
-
86
-
87
-
88
-
89
-
90
-
91
-
92
-
93
-
94
-
95
-
96
-
97
-
98
-
99
-
100
-
101
-
102
-
103
-
104
-
105
-
106
-
 107
107 -
 108
108 -
 109
109 -
 110
110 -
 111
111 -
 112
112 -
 113
113 -
 114
114 -
 115
115 -
 116
116 -
 117
117 -
118
-
119
-
120
-
121
-
122
-
123
-
124
-
125
-
126
-
127
-
128
-
129
-
130
-
131
-
132
-
133
-
134
-
135
-
136
-
137
-
138
-
139
-
140
-
141
-
142
-
143
-
144
-
145
-
146
-
147
-
148
-
149
-
150
-
151
-
152
-
153
-
154
-
155
-
156
-
157
-
158
-
159
-
160
-
161
-
162
-
163
-
164
-
165
-
166
-
167
-
168
-
169
-
170
-
171
-
172
-
173
-
174
-
175
-
176
-
177
-
178
-
179
-
180
-
181
-
182
-
183
-
184
-
185
-
186
-
187
-
188
-
189
-
190
-
191
-
192
-
193
-
194
-
195
-
196
-
197
-
198
-
199
-
200
-
201
-
202
-
203
-
204
-
205
-
206
-
207
-
208
-
209
-
210
-
211
-
212
-
213
-
214
-
215
-
216
-
217
-
218
-
219
-
220
-
221
-
222
-
223
-
224
-
225
-
226
-
227
-
228
-
229
-
230
-
231
-
232
-
233
-
234
-
235
-
236
-
237
-
238
-
239
-
240
-
241
-
242
-
243
-
244
-
245
-
246
-
247
-
248
-
249
-
250
-
251
-
252
-
253
-
254
-
255
-
256
-
257
-
258
-
259
-
260
-
261
-
262
-
263
-
264
-
265
-
266
-
267
-
268
-
269
-
270
-
271
-
272
-
273
-
274
-
275
-
276
-
277
-
278
-
279
-
280
-
281
-
282
-
283
-
284
-
285
-
286
-
287
-
288
-
289
-
290
-
291
-
292
-
293
-
294
-
295
-
296
-
297
-
298
-
299
-
300
-
301
-
302
-
303
-
304
-
305
-
306
-
307
-
308
-
309
-
310
-
311
-
312
-
313
-
314
-
315
-
316
-
317
-
318
-
319
 |
 |