Lexmark 6500 User Guide - Page 225
Erasing volatile memory, Disposing of a printer or scanner hard drive
 |
View all Lexmark 6500 manuals
Add to My Manuals
Save this manual to your list of manuals |
Page 225 highlights
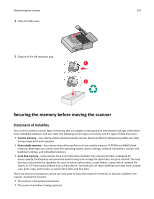
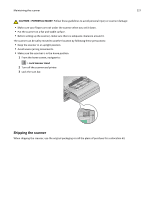
Maintaining the scanner 225 • The scanner is being moved to a different department or location. • The scanner is being serviced by someone from outside your organization. • The scanner is being removed from your premises for service. Disposing of a printer or scanner hard drive Note: Not all printers or scanners have a hard disk installed. In high‑security environments, it may be necessary to take additional steps to ensure that confidential data stored on the scanner hard disk cannot be accessed once the scanner-or its hard disk-is removed from your premises. • Degaussing-Flushes the hard drive with a magnetic field that erases stored data • Crushing-Physically compresses the hard disk to break component parts and render them unreadable • Milling-Physically shreds the hard disk into small metal bits Note: The only way to guarantee that all data is completely erased is to physically destroy each memory device on which data could have been stored. Erasing volatile memory The volatile memory (RAM) installed in your scanner requires a power source to retain information. To erase the buffered data, simply power down the device. Erasing non‑volatile memory • Individual settings, device and network settings, security settings, and embedded solutions-Erase information and settings by selecting Wipe All Settings in the Configuration menu. • Fax data-Erase fax settings and data by selecting Wipe All Settings in the Configuration menu. 1 Turn off the scanner. 2 Hold down 2ABC and 6MNO while turning the scanner on. Release the buttons only when the screen with the progress bar appears. The scanner performs a power-on sequence, and then the Configuration menu appears. When the scanner is fully powered up, the touch screen displays a list of functions, instead of the standard home screen icons. 3 Touch Wipe All Settings. The scanner will reboot several times during this process. Note: Wipe All Settings securely removes device settings, solutions, jobs, faxes, and passwords in the scanner. 4 Touch Back > Exit Config Menu. The scanner will power‑on reset, and then return to normal operating mode.
-
 1
1 -
2
-
3
-
4
-
5
-
6
-
7
-
8
-
9
-
10
-
11
-
12
-
13
-
14
-
15
-
16
-
17
-
18
-
19
-
20
-
21
-
22
-
23
-
24
-
25
-
26
-
27
-
28
-
29
-
30
-
31
-
32
-
33
-
34
-
35
-
36
-
37
-
38
-
39
-
40
-
41
-
42
-
43
-
44
-
45
-
46
-
47
-
48
-
49
-
50
-
51
-
52
-
53
-
54
-
55
-
56
-
57
-
58
-
59
-
60
-
61
-
62
-
63
-
64
-
65
-
66
-
67
-
68
-
69
-
70
-
71
-
72
-
73
-
74
-
75
-
76
-
77
-
78
-
79
-
80
-
81
-
82
-
83
-
84
-
85
-
86
-
87
-
88
-
89
-
90
-
91
-
92
-
93
-
94
-
95
-
96
-
97
-
98
-
99
-
100
-
101
-
102
-
103
-
104
-
105
-
106
-
107
-
108
-
109
-
110
-
111
-
112
-
113
-
114
-
115
-
116
-
117
-
118
-
119
-
120
-
121
-
122
-
123
-
124
-
125
-
126
-
127
-
128
-
129
-
130
-
131
-
132
-
133
-
134
-
135
-
136
-
137
-
138
-
139
-
140
-
141
-
142
-
143
-
144
-
145
-
146
-
147
-
148
-
149
-
150
-
151
-
152
-
153
-
154
-
155
-
156
-
157
-
158
-
159
-
160
-
161
-
162
-
163
-
164
-
165
-
166
-
167
-
168
-
169
-
170
-
171
-
172
-
173
-
174
-
175
-
176
-
177
-
178
-
179
-
180
-
181
-
182
-
183
-
184
-
185
-
186
-
187
-
188
-
189
-
190
-
191
-
192
-
193
-
194
-
195
-
196
-
197
-
198
-
199
-
200
-
201
-
202
-
203
-
204
-
205
-
206
-
207
-
208
-
209
-
210
-
211
-
212
-
213
-
214
-
215
-
216
-
217
-
218
-
219
-
 220
220 -
 221
221 -
 222
222 -
 223
223 -
 224
224 -
 225
225 -
 226
226 -
 227
227 -
 228
228 -
 229
229 -
 230
230 -
231
-
232
-
233
-
234
-
235
-
236
-
237
-
238
-
239
-
240
-
241
-
242
-
243
-
244
-
245
-
246
-
247
-
248
-
249
-
250
-
251
-
252
-
253
-
254
-
255
-
256
-
257
-
258
-
259
-
260
-
261
-
262
-
263
-
264
-
265
-
266
-
267
-
268
-
269
-
270
-
271
-
272
-
273
-
274
-
275
-
276
-
277
-
278
-
279
-
280
-
281
-
282
-
283
-
284
-
285
-
286
-
287
-
288
-
289
-
290
-
291
-
292
-
293
-
294
-
295
-
296
-
297
-
298
-
299
-
300
-
301
-
302
-
303
-
304
-
305
-
306
-
307
-
308
-
309
-
310
-
311
-
312
-
313
-
314
-
315
-
316
-
317
-
318
-
319
 |
 |