Lexmark P350 Getting Started - Page 14
Using the Print Photos menu, Using the Transfer menu, Print Photos, Transfer, USB Flash Drive
 |
View all Lexmark P350 manuals
Add to My Manuals
Save this manual to your list of manuals |
Page 14 highlights
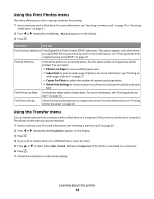
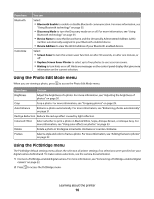
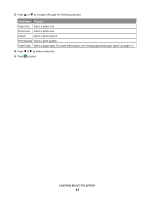
Using the Print Photos menu This menu allows you to select a group of photos for printing. 1 Insert a memory card or flash drive. For more information, see "Inserting a memory card" on page 20 or "Inserting a flash drive" on page 21. 2 Press or repeatedly until Print Photos appears on the display. 3 Press . From here You can Print Camera Selections Print Digital Print Order Format (DPOF) selections. This option appears only when there is a valid DPOF file on your memory card. For more information, see "Printing photos from a digital camera using DPOF" on page 27. Print All N Photos Print all the photos on a memory device. N is the total number of images that will be printed. You can select: • Photo/s on Paper to view available paper sizes. • Index Print to print an index page of photos. For more information, see "Printing an index page of photos" on page 27. • Copies Per Photo to select the number of copies to print per photo. • Other Print Settings to choose a paper size, photo size, layout, print quality, and paper type. Print Photos by Date Print photos taken within certain dates. For more information, see "Printing photos by date" on page 25. Print Photo Range Select the first and last photos in a range to be printed. For more information, see "Printing photos by range" on page 26. Using the Transfer menu You can transfer photos from a memory card to a flash drive or a computer (if the printer is attached to a computer). The photos on the memory card are retained. 1 Insert a memory card. For more information, see "Inserting a memory card" on page 20. 2 Press or repeatedly until Transfer appears on the display. 3 Press . 4 If you wish to transfer photos to a USB flash drive, insert the drive. 5 Press or to select either USB Flash Drive or Computer (if the printer is attached to a computer). 6 Press . 7 Follow the instructions on the printer display. Learning about the printer 14
-
 1
1 -
2
-
3
-
4
-
5
-
6
-
7
-
8
-
 9
9 -
 10
10 -
 11
11 -
 12
12 -
 13
13 -
 14
14 -
 15
15 -
 16
16 -
 17
17 -
 18
18 -
 19
19 -
20
-
21
-
22
-
23
-
24
-
25
-
26
-
27
-
28
-
29
-
30
-
31
-
32
-
33
-
34
-
35
-
36
-
37
-
38
-
39
-
40
-
41
-
42
-
43
-
44
-
45
-
46
-
47
-
48
-
49
-
50
-
51
-
52
-
53
 |
 |
