Lexmark W820 Setup Guide - Page 75
then rotate the divertor cover as, shown. Gently press the assembly
 |
UPC - 734646210508
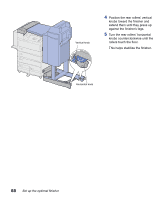
View all Lexmark W820 manuals
Add to My Manuals
Save this manual to your list of manuals |
Page 75 highlights
Extended tabs 2 Install the divertor cover on the top of the printer. Be sure the side with the extended tabs is in place first, then rotate the divertor cover as shown. Gently press the assembly in place. Set up the optional finisher 63
-
 1
1 -
2
-
3
-
4
-
5
-
6
-
7
-
8
-
9
-
10
-
11
-
12
-
13
-
14
-
15
-
16
-
17
-
18
-
19
-
20
-
21
-
22
-
23
-
24
-
25
-
26
-
27
-
28
-
29
-
30
-
31
-
32
-
33
-
34
-
35
-
36
-
37
-
38
-
39
-
40
-
41
-
42
-
43
-
44
-
45
-
46
-
47
-
48
-
49
-
50
-
51
-
52
-
53
-
54
-
55
-
56
-
57
-
58
-
59
-
60
-
61
-
62
-
63
-
64
-
65
-
66
-
67
-
68
-
69
-
 70
70 -
 71
71 -
 72
72 -
 73
73 -
 74
74 -
 75
75 -
 76
76 -
 77
77 -
 78
78 -
 79
79 -
 80
80 -
81
-
82
-
83
-
84
-
85
-
86
-
87
-
88
-
89
-
90
-
91
-
92
-
93
-
94
-
95
-
96
-
97
-
98
-
99
-
100
-
101
-
102
-
103
-
104
-
105
-
106
-
107
-
108
-
109
-
110
-
111
-
112
-
113
-
114
-
115
-
116
-
117
-
118
-
119
-
120
-
121
-
122
-
123
-
124
-
125
-
126
 |
 |

63
Set up the optional finisher
2
Install the divertor cover on the
top of the printer.
Be sure the side with the
extended tabs is in place first,
then rotate the divertor cover as
shown. Gently press the assembly
in place.
Extended tabs