Lexmark W820 Setup Guide - Page 78
Attaching the cables
 |
UPC - 734646210508
View all Lexmark W820 manuals
Add to My Manuals
Save this manual to your list of manuals |
Page 78 highlights
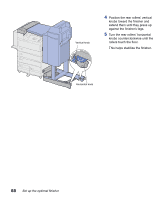
Attaching the cables CAUTION! Make sure the printer is turned off and unplugged before continuing. Transport unit cable Power cable Communication cable Three cables come with the finisher: two of the cables connect the finisher with the printer and one cable is pre-attached to the transport unit. 1 Attach one end of the communication cable to the middle connector on the finisher. Tighten the thumbscrews to ensure a good connection. 2 Attach the other end of the communication cable into the middle connector labeled "Output" on the printer. 3 Attach the transport unit cable to the top connector on the finisher. Tighten the thumbscrews to ensure a good connection. 4 Attach one end of the power cable to the bottom connector on the finisher. 5 Attach the other end of the power cable into the electrical connector on the side of the printer. 66 Set up the optional finisher
-
 1
1 -
2
-
3
-
4
-
5
-
6
-
7
-
8
-
9
-
10
-
11
-
12
-
13
-
14
-
15
-
16
-
17
-
18
-
19
-
20
-
21
-
22
-
23
-
24
-
25
-
26
-
27
-
28
-
29
-
30
-
31
-
32
-
33
-
34
-
35
-
36
-
37
-
38
-
39
-
40
-
41
-
42
-
43
-
44
-
45
-
46
-
47
-
48
-
49
-
50
-
51
-
52
-
53
-
54
-
55
-
56
-
57
-
58
-
59
-
60
-
61
-
62
-
63
-
64
-
65
-
66
-
67
-
68
-
69
-
70
-
71
-
72
-
 73
73 -
 74
74 -
 75
75 -
 76
76 -
 77
77 -
 78
78 -
 79
79 -
 80
80 -
 81
81 -
 82
82 -
 83
83 -
84
-
85
-
86
-
87
-
88
-
89
-
90
-
91
-
92
-
93
-
94
-
95
-
96
-
97
-
98
-
99
-
100
-
101
-
102
-
103
-
104
-
105
-
106
-
107
-
108
-
109
-
110
-
111
-
112
-
113
-
114
-
115
-
116
-
117
-
118
-
119
-
120
-
121
-
122
-
123
-
124
-
125
-
126
 |
 |
