NEC NP-P502WL Users Manual - Page 119
(5) Using the Computer Cable (VGA) to Operate the Projector (Virtual Remote Tool), Control Functions
 |
View all NEC NP-P502WL manuals
Add to My Manuals
Save this manual to your list of manuals |
Page 119 highlights
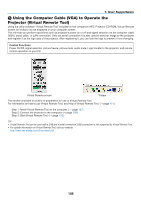
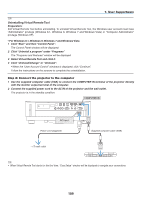
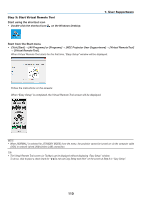
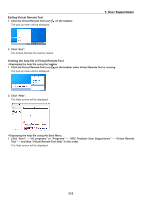
7. User Supportware ❺ Using the Computer Cable (VGA) to Operate the Projector (Virtual Remote Tool) Using the utility software "Virtual Remote Tool" included on the companion NEC Projector CD-ROM, Virtual Remote screen (or toolbar) can be displayed on your computer screen. This will help you perform operations such as projector's power on or off and signal selection via the computer cable (VGA), serial cable, or LAN connection. Only via serial connection it is also used to send an image to the projector and register it as the logo data of the projector. After registering it, you can lock the logo to prevent it from changing. Control Functions Power On/Off, signal selection, picture freeze, picture mute, audio mute, Logo transfer to the projector, and remote control operation on your PC. Virtual Remote screen Toolbar This section provides an outline of preparation for use of Virtual Remote Tool. For information on how to use Virtual Remote Tool, see Help of Virtual Remote Tool. (→ page 111) Step 1: Install Virtual Remote Tool on the computer. (→ page 107) Step 2: Connect the projector to the computer. (→ page 109) Step 3: Start Virtual Remote Tool. (→ page 110) TIP: • Virtual Remote Tool can be used with a LAN and a serial connection. USB connection is not supported by Virtual Remote Tool. • For update information on Virtual Remote Tool, visit our website: http://www.nec-display.com/dl/en/index.html 106
-
 1
1 -
2
-
3
-
4
-
5
-
6
-
7
-
8
-
9
-
10
-
11
-
12
-
13
-
14
-
15
-
16
-
17
-
18
-
19
-
20
-
21
-
22
-
23
-
24
-
25
-
26
-
27
-
28
-
29
-
30
-
31
-
32
-
33
-
34
-
35
-
36
-
37
-
38
-
39
-
40
-
41
-
42
-
43
-
44
-
45
-
46
-
47
-
48
-
49
-
50
-
51
-
52
-
53
-
54
-
55
-
56
-
57
-
58
-
59
-
60
-
61
-
62
-
63
-
64
-
65
-
66
-
67
-
68
-
69
-
70
-
71
-
72
-
73
-
74
-
75
-
76
-
77
-
78
-
79
-
80
-
81
-
82
-
83
-
84
-
85
-
86
-
87
-
88
-
89
-
90
-
91
-
92
-
93
-
94
-
95
-
96
-
97
-
98
-
99
-
100
-
101
-
102
-
103
-
104
-
105
-
106
-
107
-
108
-
109
-
110
-
111
-
112
-
113
-
 114
114 -
 115
115 -
 116
116 -
 117
117 -
 118
118 -
 119
119 -
 120
120 -
 121
121 -
 122
122 -
 123
123 -
 124
124 -
125
-
126
-
127
-
128
-
129
-
130
-
131
-
132
-
133
-
134
-
135
-
136
-
137
-
138
-
139
-
140
-
141
-
142
-
143
-
144
-
145
-
146
-
147
 |
 |
