NEC NP-P502WL Users Manual - Page 120
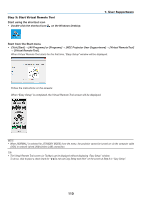
Step 1: Install Virtual Remote Tool on the computer
 |
View all NEC NP-P502WL manuals
Add to My Manuals
Save this manual to your list of manuals |
Page 120 highlights
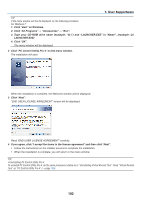
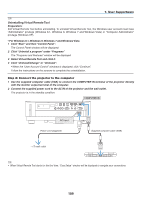
7. User Supportware NOTE: • When [COMPUTER] is selected from your source selection, the Virtual Remote screen or the toolbar will be displayed as well as your computer screen. • Use the supplied computer cable (VGA) to connect the COMPUTER IN terminal directly with the monitor output terminal of the computer to use Virtual Remote Tool. Using a switcher or other cables than the supplied computer cable (VGA) may cause failure in signal communication. VGA cable terminal: Pin Nos. 12 and 15 are required for DDC/CI. • Virtual Remote Tool may not work depending on your computer's specifications and version of graphic adapters or drivers. • To run Virtual Remote Tool on Windows 8.1 and Windows 8, "Microsoft .NET Framework Version 2.0" is required. The Microsoft .NET Framework Version 2.0, 3.0 or 3.5 is available from Microsoft's web page. Download and install it on your computer. • Logo data (graphics) that can be sent to the projector with Virtual Remote Tool has the following restrictions: (Only via serial connection) - File size: Less than 768 KB - Image size (resolution): P502HL: Horizontal 1920 × vertical 1080 dots or less P502WL: Horizontal 1280 × vertical 800 dots or less • To put the default "NEC logo" back in the background logo, you need to register it as the background logo by using the image file (P502HL: /Logo/NEC_logo2012_1920x1080.bmp, P502WL: /Logo/NEC_logo2011_1280x800.bmp) inclulded on the supplied NEC Projector CD-ROM. TIP: • The projector's COMPUTER IN terminal supports DDC/CI (Display Data Channel Command Interface). DDC/CI is a standard interface for bidirectional communication between display/projector and computer. • With the Virtual Remote Tool, control is possible with both network (wired/wireless LAN) and serial connections. Step 1: Install Virtual Remote Tool on the computer NOTE: • To install Virtual Remote Tool, the Windows user account must have "Administrator" privilege. • Exit all running programs before installing Virtual Remote Tool. If another program is running, the installation may not be com- pleted. 1 Insert the accompanying NEC Projector CD-ROM into your CD-ROM drive. The menu window will be displayed. TIP: If the menu window will not be displayed, try the following procedure. For Windows 7 1. Click "start" on Windows. 2. Click "All Programs" → "Accessories" → "Run". 3. Type your CD-ROM drive name (example: "Q:\") and "LAUNCHER.EXE" in "Name". (example: Q:\ LAUNCHER.EXE) 4. Click "OK". The menu window will be displayed. 107
-
 1
1 -
2
-
3
-
4
-
5
-
6
-
7
-
8
-
9
-
10
-
11
-
12
-
13
-
14
-
15
-
16
-
17
-
18
-
19
-
20
-
21
-
22
-
23
-
24
-
25
-
26
-
27
-
28
-
29
-
30
-
31
-
32
-
33
-
34
-
35
-
36
-
37
-
38
-
39
-
40
-
41
-
42
-
43
-
44
-
45
-
46
-
47
-
48
-
49
-
50
-
51
-
52
-
53
-
54
-
55
-
56
-
57
-
58
-
59
-
60
-
61
-
62
-
63
-
64
-
65
-
66
-
67
-
68
-
69
-
70
-
71
-
72
-
73
-
74
-
75
-
76
-
77
-
78
-
79
-
80
-
81
-
82
-
83
-
84
-
85
-
86
-
87
-
88
-
89
-
90
-
91
-
92
-
93
-
94
-
95
-
96
-
97
-
98
-
99
-
100
-
101
-
102
-
103
-
104
-
105
-
106
-
107
-
108
-
109
-
110
-
111
-
112
-
113
-
114
-
 115
115 -
 116
116 -
 117
117 -
 118
118 -
 119
119 -
 120
120 -
 121
121 -
 122
122 -
 123
123 -
 124
124 -
 125
125 -
126
-
127
-
128
-
129
-
130
-
131
-
132
-
133
-
134
-
135
-
136
-
137
-
138
-
139
-
140
-
141
-
142
-
143
-
144
-
145
-
146
-
147
 |
 |