Netgear FS728TPv1 FS728TP User Manual - Page 119
QoS > CoS> Advanced > CoS to Queue Mapping, CoS to Queue Mapping, Queue
 |
View all Netgear FS728TPv1 manuals
Add to My Manuals
Save this manual to your list of manuals |
Page 119 highlights
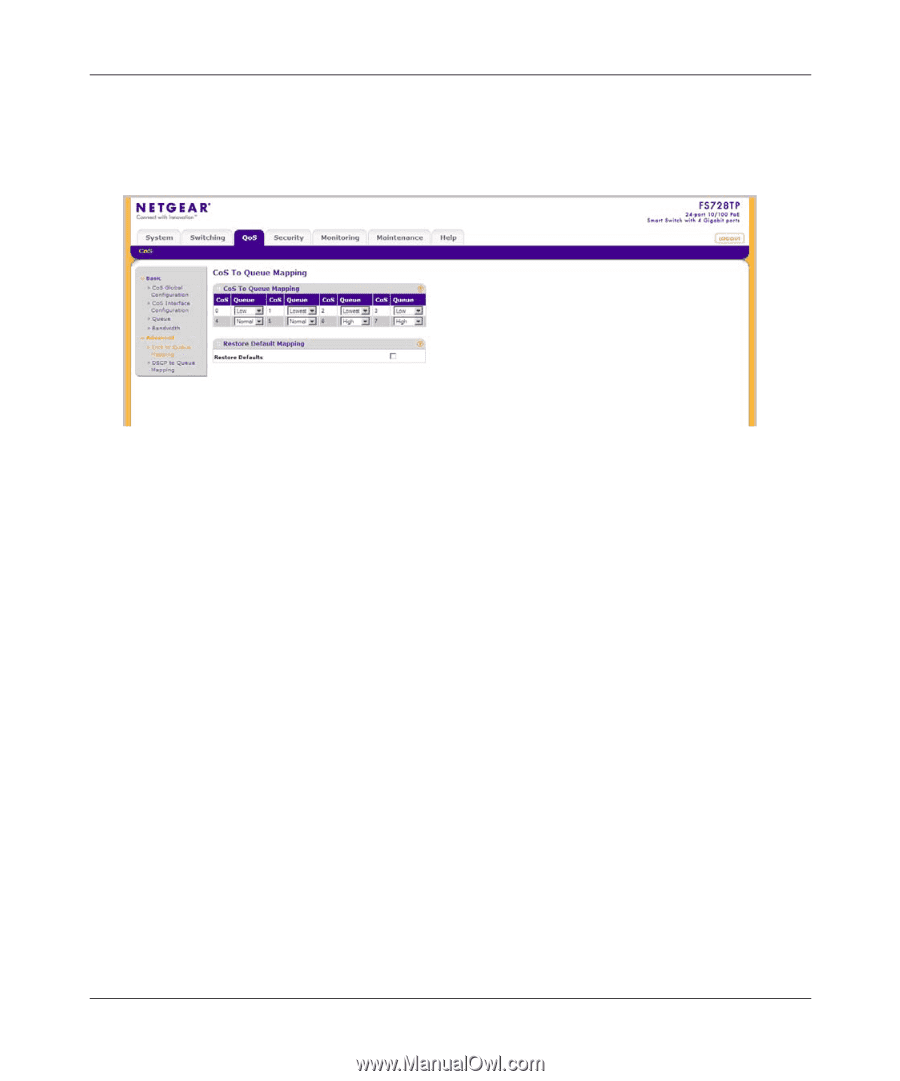
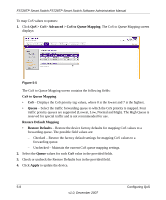
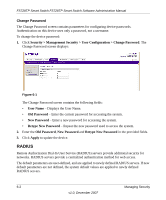
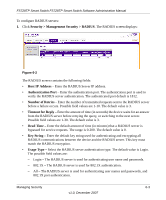
FS728TP Smart Switch FS728TP Smart Switch Software Administration Manual To map CoS values to queues: 1. Click QoS > CoS> Advanced > CoS to Queue Mapping. The CoS to Queue Mapping screen displays: Figure 5-5 The CoS to Queue Mapping screen contains the following fields: CoS to Queue Mapping • CoS - Displays the CoS priority tag values, where 0 is the lowest and 7 is the highest. • Queue - Select the traffic forwarding queue to which the CoS priority is mapped. Four traffic priority queues are supported (Lowest, Low, Normal and High). The High Queue is reserved for special traffic and is not recommended for use. Restore Default Mapping • Restore Defaults - Restore the device factory defaults for mapping CoS values to a forwarding queue. The possible field values are: - Checked - Restore the factory default settings for mapping CoS values to a forwarding queue. - Unchecked - Maintain the current CoS queue mapping settings. 2. Select the Queue values for each CoS value in the provided fields. 3. Check or uncheck the Restore Defaults box in the provided field. 4. Click Apply to update the device. 5-8 Configuring QoS v1.0, December 2007
-
 1
1 -
2
-
3
-
4
-
5
-
6
-
7
-
8
-
9
-
10
-
11
-
12
-
13
-
14
-
15
-
16
-
17
-
18
-
19
-
20
-
21
-
22
-
23
-
24
-
25
-
26
-
27
-
28
-
29
-
30
-
31
-
32
-
33
-
34
-
35
-
36
-
37
-
38
-
39
-
40
-
41
-
42
-
43
-
44
-
45
-
46
-
47
-
48
-
49
-
50
-
51
-
52
-
53
-
54
-
55
-
56
-
57
-
58
-
59
-
60
-
61
-
62
-
63
-
64
-
65
-
66
-
67
-
68
-
69
-
70
-
71
-
72
-
73
-
74
-
75
-
76
-
77
-
78
-
79
-
80
-
81
-
82
-
83
-
84
-
85
-
86
-
87
-
88
-
89
-
90
-
91
-
92
-
93
-
94
-
95
-
96
-
97
-
98
-
99
-
100
-
101
-
102
-
103
-
104
-
105
-
106
-
107
-
108
-
109
-
110
-
111
-
112
-
113
-
 114
114 -
 115
115 -
 116
116 -
 117
117 -
 118
118 -
 119
119 -
 120
120 -
 121
121 -
 122
122 -
 123
123 -
 124
124 -
125
-
126
-
127
-
128
-
129
-
130
-
131
-
132
-
133
-
134
-
135
-
136
-
137
-
138
-
139
-
140
-
141
-
142
-
143
-
144
-
145
-
146
-
147
-
148
-
149
-
150
-
151
-
152
-
153
-
154
-
155
-
156
-
157
-
158
-
159
-
160
-
161
-
162
-
163
-
164
-
165
-
166
-
167
-
168
-
169
-
170
-
171
-
172
-
173
-
174
-
175
-
176
-
177
-
178
-
179
-
180
-
181
-
182
-
183
-
184
-
185
 |
 |