Netgear RN3138 Rackmount Hardware Manual - Page 46
Extend the ball shuttle to the very front., Align the rails and push the chassis in.
 |
View all Netgear RN3138 manuals
Add to My Manuals
Save this manual to your list of manuals |
Page 46 highlights
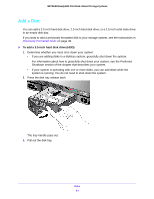
NETGEAR ReadyNAS OS 6 Rack-Mount Storage Systems 3. Use the provided mounting screws to mount the inner rails to the system chassis, as follows: a. Fasten the backs of the outer rails to the rack with screws. b. Press the release to extend the rails. c. Hang the hooks of the rails in the rack holes, and fasten the rails to the rack. 4. Attach the chassis to the rack, as follows: a. Extend the ball shuttle to the very front. b. Align the rails and push the chassis in. c. Secure the handles to the outer rails with screws. The rack-mount installation is complete. ReadyNAS 3220 and 4220 46
-
 1
1 -
2
-
3
-
4
-
5
-
6
-
7
-
8
-
9
-
10
-
11
-
12
-
13
-
14
-
15
-
16
-
17
-
18
-
19
-
20
-
21
-
22
-
23
-
24
-
25
-
26
-
27
-
28
-
29
-
30
-
31
-
32
-
33
-
34
-
35
-
36
-
37
-
38
-
39
-
40
-
 41
41 -
 42
42 -
 43
43 -
 44
44 -
 45
45 -
 46
46 -
 47
47 -
 48
48 -
 49
49 -
 50
50 -
 51
51 -
52
-
53
-
54
-
55
-
56
-
57
-
58
-
59
-
60
-
61
-
62
-
63
-
64
-
65
-
66
-
67
-
68
-
69
-
70
-
71
-
72
-
73
-
74
-
75
-
76
-
77
-
78
 |
 |

ReadyNAS 3220 and 4220
46
NETGEAR ReadyNAS OS 6 Rack-Mount Storage Systems
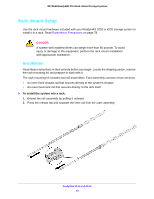
3.
Use the provided mounting screws to mount the inner rails to the system chassis, as follows:
a.
Fasten the backs of the outer rails to the rack with screws.
b.
Press the release to extend the rails.
c.
Hang the hooks of the rails in the rack holes, and fasten the rails to the rack.
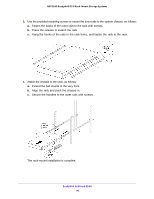
4.
Attach the chassis to the rack, as follows:
a.
Extend the ball shuttle to the very front.
b.
Align the rails and push the chassis in.
c.
Secure the handles to the outer rails with screws.
The rack-mount installation is complete.