Netgear RN3138 Rackmount Hardware Manual - Page 54
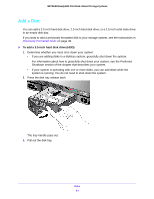
To add a 2.5-inch hard disk drive HDD or 2.5-inch solid-state drive SSD
 |
View all Netgear RN3138 manuals
Add to My Manuals
Save this manual to your list of manuals |
Page 54 highlights
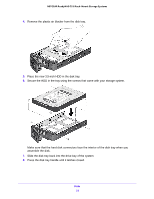
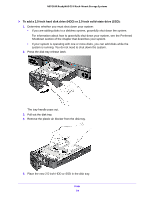
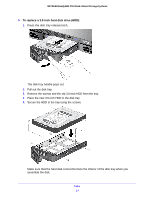
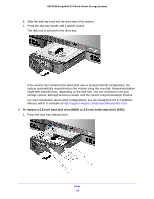
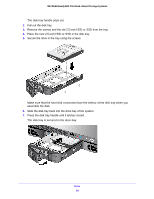
NETGEAR ReadyNAS OS 6 Rack-Mount Storage Systems To add a 2.5-inch hard disk drive (HDD) or 2.5-inch solid-state drive (SSD): 1. Determine whether you must shut down your system: • If you are adding disks to a diskless system, gracefully shut down the system. For information about how to gracefully shut down your system, see the Preferred Shutdown section of the chapter that describes your system. • If your system is operating with one or more disks, you can add disks while the system is running. You do not need to shut down the system. 2. Press the disk tray release latch. The tray handle pops out. 3. Pull out the disk tray. 4. Remove the plastic air blocker from the disk tray. 5. Place the new 2.5-inch HDD or SSD in the disk tray. Disks 54
-
 1
1 -
2
-
3
-
4
-
5
-
6
-
7
-
8
-
9
-
10
-
11
-
12
-
13
-
14
-
15
-
16
-
17
-
18
-
19
-
20
-
21
-
22
-
23
-
24
-
25
-
26
-
27
-
28
-
29
-
30
-
31
-
32
-
33
-
34
-
35
-
36
-
37
-
38
-
39
-
40
-
41
-
42
-
43
-
44
-
45
-
46
-
47
-
48
-
 49
49 -
 50
50 -
 51
51 -
 52
52 -
 53
53 -
 54
54 -
 55
55 -
 56
56 -
 57
57 -
 58
58 -
 59
59 -
60
-
61
-
62
-
63
-
64
-
65
-
66
-
67
-
68
-
69
-
70
-
71
-
72
-
73
-
74
-
75
-
76
-
77
-
78
 |
 |
