Netgear RN3138 Rackmount Hardware Manual - Page 52
Make sure that the hard disk connectors face the interior of the disk tray when
 |
View all Netgear RN3138 manuals
Add to My Manuals
Save this manual to your list of manuals |
Page 52 highlights
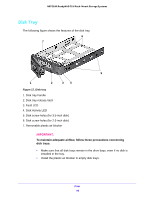
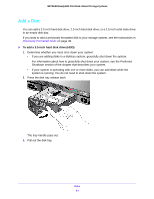
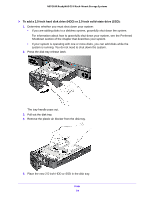
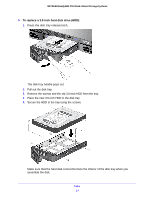
NETGEAR ReadyNAS OS 6 Rack-Mount Storage Systems 4. Remove the plastic air blocker from the disk tray. 5. Place the new 3.5-inch HDD in the disk tray. 6. Secure the HDD in the tray using the screws that came with your storage system. Make sure that the hard disk connectors face the interior of the disk tray when you assemble the disk. 7. Slide the disk tray back into the drive bay of the system. 8. Press the disk tray handle until it latches closed. Disks 52
-
 1
1 -
2
-
3
-
4
-
5
-
6
-
7
-
8
-
9
-
10
-
11
-
12
-
13
-
14
-
15
-
16
-
17
-
18
-
19
-
20
-
21
-
22
-
23
-
24
-
25
-
26
-
27
-
28
-
29
-
30
-
31
-
32
-
33
-
34
-
35
-
36
-
37
-
38
-
39
-
40
-
41
-
42
-
43
-
44
-
45
-
46
-
 47
47 -
 48
48 -
 49
49 -
 50
50 -
 51
51 -
 52
52 -
 53
53 -
 54
54 -
 55
55 -
 56
56 -
 57
57 -
58
-
59
-
60
-
61
-
62
-
63
-
64
-
65
-
66
-
67
-
68
-
69
-
70
-
71
-
72
-
73
-
74
-
75
-
76
-
77
-
78
 |
 |

Disks
52
NETGEAR ReadyNAS OS 6 Rack-Mount Storage Systems
4.
Remove the plastic air blocker from the disk tray.
5.
Place the new 3.5-inch HDD in the disk tray.
6.
Secure the HDD in the tray using the screws that came with your storage system.
Make sure that the hard disk connectors face the interior of the disk tray when you
assemble the disk.
7.
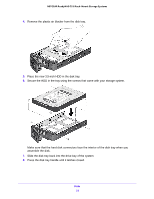
Slide the disk tray back into the drive bay of the system.
8.
Press the disk tray handle until it latches closed.