Nokia CK-7WI User Guide - Page 89
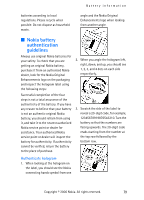
Nokia battery authentication guidelines, Authenticate hologram
 |
UPC - 758478516508
View all Nokia CK-7WI manuals
Add to My Manuals
Save this manual to your list of manuals |
Page 89 highlights
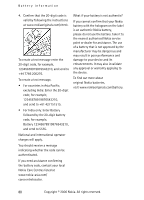
Battery information batteries according to local regulations. Please recycle when possible. Do not dispose as household waste. angle and the Nokia Original Enhancements logo when looking from another angle. ■ Nokia battery authentication guidelines Always use original Nokia batteries for your safety. To check that you are getting an original Nokia battery, purchase it from an authorised Nokia dealer, look for the Nokia Original Enhancements logo on the packaging and inspect the hologram label using the following steps: Successful completion of the four steps is not a total assurance of the authenticity of the battery. If you have any reason to believe that your battery is not an authentic original Nokia battery, you should refrain from using it, and take it to the nearest authorised Nokia service point or dealer for assistance. Your authorised Nokia service point or dealer will inspect the battery for authenticity. If authenticity cannot be verified, return the battery to the place of purchase. 2. When you angle the hologram left, right, down, and up, you should see 1, 2, 3, and 4 dots on each side respectively. 3. Scratch the side of the label to reveal a 20-digit code, for example, 12345678919876543210. Turn the battery so that the numbers are facing upwards. The 20-digit code reads starting from the number at the top row followed by the bottom row. Authenticate hologram 1. When looking at the hologram on the label, you should see the Nokia connecting hands symbol from one Copyright © 2006 Nokia. All rights reserved. 79
-
 1
1 -
2
-
3
-
4
-
5
-
6
-
7
-
8
-
9
-
10
-
11
-
12
-
13
-
14
-
15
-
16
-
17
-
18
-
19
-
20
-
21
-
22
-
23
-
24
-
25
-
26
-
27
-
28
-
29
-
30
-
31
-
32
-
33
-
34
-
35
-
36
-
37
-
38
-
39
-
40
-
41
-
42
-
43
-
44
-
45
-
46
-
47
-
48
-
49
-
50
-
51
-
52
-
53
-
54
-
55
-
56
-
57
-
58
-
59
-
60
-
61
-
62
-
63
-
64
-
65
-
66
-
67
-
68
-
69
-
70
-
71
-
72
-
73
-
74
-
75
-
76
-
77
-
78
-
79
-
80
-
81
-
82
-
83
-
 84
84 -
 85
85 -
 86
86 -
 87
87 -
 88
88 -
 89
89 -
 90
90 -
 91
91 -
 92
92 -
 93
93 -
 94
94 -
95
-
96
-
97
-
98
-
99
-
100
-
101
-
102
 |
 |
