Olympus DM-2 DM-4 Detailed Instructions (English) - Page 152
drive with the recorder, and open
 |
View all Olympus DM-2 manuals
Add to My Manuals
Save this manual to your list of manuals |
Page 152 highlights
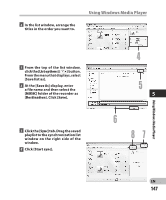
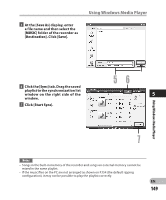
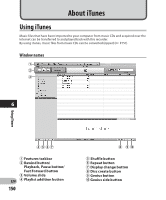
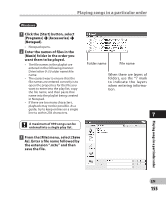
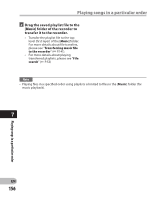
Using iTunes Transferring music file to the recorder You can transfer the music files saved in your PC to this recorder. For how to copy the music files from the CD to your PC, please see "Copying music from CD" (☞ P.151). 1 Connect the recorder to a PC, and start iTunes. 2 Select the play list to be transferred to the recorder, and put the check marks on the music files that you want to transfer. • The order of music pieces can be changed by Drag & Drop of the music file in the play list displayed. 2 3 Double-click the corresponding drive with the recorder, and open 6 [Music] folder. • When you connect the recorder to a Mac OS, it will be recognized by the drive name of the product name on the desktop. • Copy to [Music] folder of the recorder when transferring the music file. 4 Select the desired files, and Drag & Drop them to [Music] folder. Drag & Drop files here Using iTunes Note • Music files in the AAC format purchased from a music distribution service such as the iTunes Store cannot be played by this recorder. EN 152
-
 1
1 -
2
-
3
-
4
-
5
-
6
-
7
-
8
-
9
-
10
-
11
-
12
-
13
-
14
-
15
-
16
-
17
-
18
-
19
-
20
-
21
-
22
-
23
-
24
-
25
-
26
-
27
-
28
-
29
-
30
-
31
-
32
-
33
-
34
-
35
-
36
-
37
-
38
-
39
-
40
-
41
-
42
-
43
-
44
-
45
-
46
-
47
-
48
-
49
-
50
-
51
-
52
-
53
-
54
-
55
-
56
-
57
-
58
-
59
-
60
-
61
-
62
-
63
-
64
-
65
-
66
-
67
-
68
-
69
-
70
-
71
-
72
-
73
-
74
-
75
-
76
-
77
-
78
-
79
-
80
-
81
-
82
-
83
-
84
-
85
-
86
-
87
-
88
-
89
-
90
-
91
-
92
-
93
-
94
-
95
-
96
-
97
-
98
-
99
-
100
-
101
-
102
-
103
-
104
-
105
-
106
-
107
-
108
-
109
-
110
-
111
-
112
-
113
-
114
-
115
-
116
-
117
-
118
-
119
-
120
-
121
-
122
-
123
-
124
-
125
-
126
-
127
-
128
-
129
-
130
-
131
-
132
-
133
-
134
-
135
-
136
-
137
-
138
-
139
-
140
-
141
-
142
-
143
-
144
-
145
-
146
-
 147
147 -
 148
148 -
 149
149 -
 150
150 -
 151
151 -
 152
152 -
 153
153 -
 154
154 -
 155
155 -
 156
156 -
 157
157 -
158
-
159
-
160
-
161
-
162
-
163
-
164
-
165
-
166
-
167
-
168
-
169
-
170
-
171
-
172
-
173
-
174
-
175
 |
 |
