Olympus DM-2 DM-4 Detailed Instructions (English) - Page 94
Formatting the recorder [Format]
 |
View all Olympus DM-2 manuals
Add to My Manuals
Save this manual to your list of manuals |
Page 94 highlights
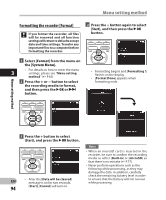
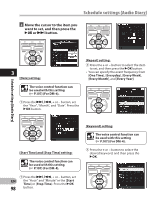
Menu setting method Formatting the recorder [Format] If you format the recorder, all files will be removed and all function settings will return to defaults except date and time settings. Transfer any important files to a computer before formatting the recorder. 4 Press the + button again to select [Start], and then press the `OK button. 1 Select [Format] from the menu on the [System Menu]. • For details on how to enter the menu 3 settings, please see "Menu setting method" (☞ P.65). 2 Press the + or − button to select the recording media to format, and then press the `OK or 9 button. • Formatting begins and [Formatting !] flashes on the display. • [Format Done] appears when formatting ends. Menu setting method 3 Press the + button to select [Start], and press the `OK button. EN • After the [Data will be cleared] message is on for two seconds, 94 [Start], [Cancel] will turn on. Notes • When an microSD card is inserted in the recorder, be sure to confirm the recording media as either [Built-in] or [microSD] so that there is no mistake (☞ P.77). • Never perform operations such as the following while processing, as they may damage the data. In addition, carefully check the remaining battery level in order to ensure that the battery will not run out while processing.
-
 1
1 -
2
-
3
-
4
-
5
-
6
-
7
-
8
-
9
-
10
-
11
-
12
-
13
-
14
-
15
-
16
-
17
-
18
-
19
-
20
-
21
-
22
-
23
-
24
-
25
-
26
-
27
-
28
-
29
-
30
-
31
-
32
-
33
-
34
-
35
-
36
-
37
-
38
-
39
-
40
-
41
-
42
-
43
-
44
-
45
-
46
-
47
-
48
-
49
-
50
-
51
-
52
-
53
-
54
-
55
-
56
-
57
-
58
-
59
-
60
-
61
-
62
-
63
-
64
-
65
-
66
-
67
-
68
-
69
-
70
-
71
-
72
-
73
-
74
-
75
-
76
-
77
-
78
-
79
-
80
-
81
-
82
-
83
-
84
-
85
-
86
-
87
-
88
-
 89
89 -
 90
90 -
 91
91 -
 92
92 -
 93
93 -
 94
94 -
 95
95 -
 96
96 -
 97
97 -
 98
98 -
 99
99 -
100
-
101
-
102
-
103
-
104
-
105
-
106
-
107
-
108
-
109
-
110
-
111
-
112
-
113
-
114
-
115
-
116
-
117
-
118
-
119
-
120
-
121
-
122
-
123
-
124
-
125
-
126
-
127
-
128
-
129
-
130
-
131
-
132
-
133
-
134
-
135
-
136
-
137
-
138
-
139
-
140
-
141
-
142
-
143
-
144
-
145
-
146
-
147
-
148
-
149
-
150
-
151
-
152
-
153
-
154
-
155
-
156
-
157
-
158
-
159
-
160
-
161
-
162
-
163
-
164
-
165
-
166
-
167
-
168
-
169
-
170
-
171
-
172
-
173
-
174
-
175
 |
 |
