Onkyo TX-DS838 Owner Manual - Page 23
TV/rnonitor.
 |
View all Onkyo TX-DS838 manuals
Add to My Manuals
Save this manual to your list of manuals |
Page 23 highlights
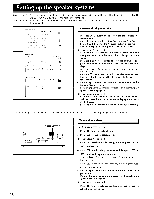
Using the on-screen display function remo e con ro on y 1111 nv , 1nn1i/1"virl = 000 0O(0@0)L VIDEO -1 000 1 Clia•VMS.12-0 N N 2 0.1•Tirle , C1 N rU N •- p N Iu N - N F' N J 4 ~Coo), 5 CONNESeICIP * I e nal F; - ,. NN = NORM, non I ra no N NE1C.CID * • • s , o7o ns , ME L NE NP El * * Im PePe em nn N Selecting the NTSC or PAL system (Net (Ma ila bole On tiLlie aa""rid Canadian II odels) If the picture on the screen scrolls with the TV signal that is being received, change the system setting. 1. To display the currently selected system type for three seconds, hold down the MEMORY button and press the VIDEO1 button once. 2. To change the setting, keep the MEMORY button held down and continue pressing the VIDEO-1 button until the desired system appears. If "OSD AUTO" is selected, the unit will automatically select the system used by the connected TV/monitor or projecter. Basic operation Use the remote control to move the cursor (the black highlighting on a setting) and enter the desired settings. 1. Press the ENTER button on the remote control to display the Menu screen. 2. Select the desired screen using the • or V cursor button on the remote control. 3. Press the P. cursor button on the remote control to display the selected screen. 4. Select the desired parameter using the • or V cursor button on the remote control and change the setting using the -1or P. cursor button. 5. After all of the desired settings have been entered, move the cursor to IESC in the screen and press the ENTER button on the remote control to return to the Menu screen. When a video source is playing, the video image is displayed behind the on-screen display. When nothing is being played, the on-screen display appears in front of the selected background color. Since the on-screen display is output only to the MONITOR OUT terminal, the display is not recorded, even if an on-screen display appears on the TV/monitor while recording. The parameters in each screen differ according to the Surround mode selected. Pressing the or Pr- cursor button while the cursor is positioned over certain items may display a sub-screen. Moving the cursor to =i and pressing the ENTER button performs the selected command or begins the chosen mode. NOTE: • Be sure to select the correct input on the TV/monitor. (For example, if the cable connected to MONITOR OUTPUT is connected to the TV/monitor's VIDEO 1 INPUT, VIDEO 1 must be selected on the TV/rnonitor.) • When using an old TV that is not installed with a video input, the on-screen display can be seen by connecting a VCR. 23
-
 1
1 -
2
-
3
-
4
-
5
-
6
-
7
-
8
-
9
-
10
-
11
-
12
-
13
-
14
-
15
-
16
-
17
-
 18
18 -
 19
19 -
 20
20 -
 21
21 -
 22
22 -
 23
23 -
 24
24 -
 25
25 -
 26
26 -
 27
27 -
 28
28 -
29
-
30
-
31
-
32
-
33
-
34
-
35
-
36
-
37
-
38
-
39
-
40
-
41
-
42
-
43
-
44
-
45
-
46
-
47
-
48
-
49
-
50
 |
 |
