Onkyo TX-DS838 Owner Manual - Page 37
Recording, source
 |
View all Onkyo TX-DS838 manuals
Add to My Manuals
Save this manual to your list of manuals |
Page 37 highlights
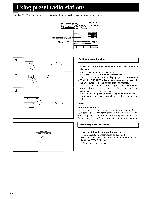
Recording a source The TX-DS838 can be used to record either the source that is currently hieing listened to/watched or a different source. Check that the components are connected to the TX-D5838 as shown in Connecting audio equipment and Connecting video equipment on pages 13 to 14. If the Multi-Room System equipment is connected, be sure the MR OFF indicator is lit while recording. Listening to/watching the source while recording it: CD.Z.TMWO On-screen display operation ONKYO I .* 1. Press the ENTER button on the remote control to display the Menu screen. 2. Move the cursor to Rec Selector and press the ► cursor button on the remote control to display the Rec Selector screen. 3. Move the cursor to Picture and/or Sound and press the 1 or ► cursor button on the remote control to select the component with "(SOURCE)" displayed below it on the left side of the screen. The components that can record it will appear on the right side. The component indicated as "(SOURCE)" is the currently selected input source. If a different component is selected in the Input Selector screen or by pressing an input selector button, "(SOURCE)" wil l appear below the name of the newly selected component. In the screen shown at the left, the currently selected video source is VIDEO-4 VCR and it can be recorded by VIDEO-1 or -2; the currently selected sound source is the CD player and it can be recorded by TAPE-1 or VIDEO-1 or -2. Sound Indicates which souno source is available for playback and which components are available for recording onto. Picture Indicates which video source is available for playback and which components are available for recording onto. 4. Start recording on the recording component, then start playing the selected source. With the on-screen display, Picture and Sound can separately be set to different components. Main unit operation = 000 0 0 (0 0 • REC OUT 'OO 1O 1. Press an input selector button to select the desired source. 2. Press 3. While the REC OUT indicator is flashing, press again. The SOURCE indicator and the indicator for the selected source light up with red boxes around them. 4. Start recording on the recording component, then start playing the selected source. NOTE: • Do not adjust any controls on the TX-DS838 after starting the recording operation. • Pressing an input selector button while recording wil l change the source being recorder, • When the T-2 MONITOR indicator is l it, only the TAPE-2 source can be recoroed. Even it' a different input selector button is pressed, the T-2 MONITOR inoicator wil l remain l it. • Certain combinations of video input and output connections will allow sound recording, but not picture recording. An input connected to the normal video connector cannot be recorded from the S connector. Be sure to check the video connections before recording. (Retie' to pages 13 and 14.) 37
-
 1
1 -
2
-
3
-
4
-
5
-
6
-
7
-
8
-
9
-
10
-
11
-
12
-
13
-
14
-
15
-
16
-
17
-
18
-
19
-
20
-
21
-
22
-
23
-
24
-
25
-
26
-
27
-
28
-
29
-
30
-
31
-
 32
32 -
 33
33 -
 34
34 -
 35
35 -
 36
36 -
 37
37 -
 38
38 -
 39
39 -
 40
40 -
 41
41 -
 42
42 -
43
-
44
-
45
-
46
-
47
-
48
-
49
-
50
 |
 |
