Onkyo TX-DS838 Owner Manual - Page 41
Start, recording, using, start
 |
View all Onkyo TX-DS838 manuals
Add to My Manuals
Save this manual to your list of manuals |
Page 41 highlights
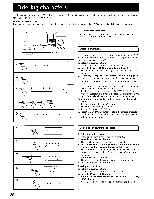
Using TAPE-2 MONITOR Recording using TAPE-2 MONITOR: COM.TNE'SE, Clo *** Menu *** nput Selector Rec Selector Surround Setup tj Screen Setup - anguace System Setup System Setup 3 2 CIPZ\TIC-1,00 ** Input Selector = VIDEO Soun TUNER Moni . Croup resew No SIrrour Mode - StAD7 ** ESC -1 PP S OFF (on c rr 10 PP JM Pe If a tape deck is connected to the TAPE-2 connectors and a source other than TAPE-2 is selected, the sound from the selected source can be recorded. On-screen display operation 1. Move the cursor to Input Selector in the Menu screen and press the ► cursor button on the remote control to display the Input Selector screen. 2. Move the cursor to Sound and press the Al or ► cursor button to display the Input Selector screen. 3. Press the Al or ► cursor button to select the desired Sound source, and then move the cursor over IDS and press the ENTER button. If OFF is selected for the TAPE-2 Moni. parameter in the Input Selector screen, the sound from the source can be heard. If a 3-head tape deck connected to the TAPE-2 connectors is being used for recording, select ON to hear the sound that is just recorded. 4. Start recording using the TAPE-2 tape deck, then start playing the selected source. Refer to the tape deck instruction manual for more details. Remote control and main unit operation 1. Press an input selector button to select the source to be recorded. If the T-2 MONITOR indicator in the display is not lit, the sound from the source can be heard. If a 3-head tape deck connected to the TAPE-2 connectors is used for recording, press either the TAPE-2 button on the remote control or the TAPE-2 MONITOR button on the main unit to light up the T-2 MONITOR indicator and hear the sound that is just recorded. 2. Start recording using the TAPE-2 tape deck, then start playing the selected source. Refer to the tape deck instruction manual for more details. NOTE: • Set the recording level with the controls on the tape deck that is being used for recording. 41
-
 1
1 -
2
-
3
-
4
-
5
-
6
-
7
-
8
-
9
-
10
-
11
-
12
-
13
-
14
-
15
-
16
-
17
-
18
-
19
-
20
-
21
-
22
-
23
-
24
-
25
-
26
-
27
-
28
-
29
-
30
-
31
-
32
-
33
-
34
-
35
-
 36
36 -
 37
37 -
 38
38 -
 39
39 -
 40
40 -
 41
41 -
 42
42 -
 43
43 -
 44
44 -
 45
45 -
 46
46 -
47
-
48
-
49
-
50
 |
 |
