Onkyo TX-SV919 Owner Manual - Page 39
Audionlitko, Recording
 |
View all Onkyo TX-SV919 manuals
Add to My Manuals
Save this manual to your list of manuals |
Page 39 highlights
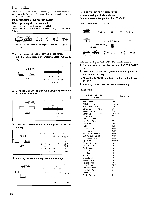
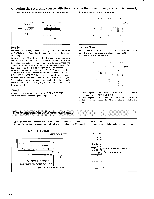
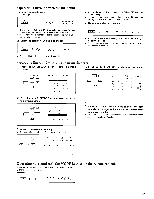
Operating with the On-screen cursor 4 P p, Tel ec7 Future cur;: = V DFO 1 T N Ft M - F= P , Preset - F = 40ch ; u r . o e - BY - Pass FCIF DOC) El • rofT • OO.00 NOTE: If no preset channels are set in any class, the class and preset indications will not change, as there are no presets to select. Class Indicates the current class of the TUNER preset memory (A to F). Pressing the -1 and PP. CURSOR keys will change the class. When the class is changed, the number shown below the new class will indicate the last channel that was selected for that class. If there are no channels set on that class at all, that class will be skipped entirely. Preset Indicates the channel preset for the selected class of the TUNER. Pressing the 1 CURSOR key will change the channel downward, and pressing the P. CURSOR key will change the channel upward. Audionlitko Recording Tape recording With the TX-SV919THX you can perform recording while listening to the sound of another source through speakers or headphones. Make all connections between the tape deck and the unit as shown in the System Connections diagram (page 11, 12). When recording a tape while the Multiple Room Remote Control is connected, turn the MR off (the MR OFF indicator will light) to disable remote control operation from other rooms NOTES: • OPTICAL input of VIDEO-4 cannot be output to REC OUT terminal of TAPE 1,2, and VIDEO-1,2,3. • When recording VIDEO-4, connect to UR audio input jacks. Recording and dubbing to a tape deck connected to TAPE-1 When recording the same source you are listening to 1. Press the Input Selector button to select the source to be recorded. (Other than TAPE-1) 3. Press the REC OUT button again while the REC OUT indicator is flashing. `010E0-.1 NOE0.4 2. Press the REC OUT button. O CFI REC OUT O REC OUT > SOURCE flash light The chosen source will be displayed in red boxes. 4. Start the device selected in step 1 while setting the tape deck connected to TAPE-1 to recording mode. • Never change the positions of any controls (bass, treble, etc.) on this unit during recording and dubbing operations. • Pressing the Input Selector button during recording will change the source being recorded. • When the TAPE-2 MONITOR indicator is on, only TAPE-2 can be recorded and if the Input Selector is changed, the TAPE-2 MONITOR indicator will not change. When recording a source different from the one you are listening to 1. Press the REC OUT button. REC OUT REC OUT SOURCE flash 2. Press the Input Selector button for the source (other than TAPE-1) to be recorded, while the REC OUT indicator is flashing. so_ 'PE LE,EEP1I 4-0I L 3. Start the source device selected in step 2, and start recording on the tape deck connected to TAPE-1, or on any recording device connected to the VIDEO-1, VIDEO-2 or VIDEO-3 audio output jacks. • The source you select to record will be output from the TAPE-1, VIDEO=1, VIDEO-2 and VIDEO-3 REC OUT jacks. The source you are listening to does not change. • If you choose to record from AM or FM while listening to another source, the tuner's frequency and class displays will be shown for 5 seconds. During this time a new preset can be selected. light The chosen source will be displayed in red boxes. 39
-
 1
1 -
2
-
3
-
4
-
5
-
6
-
7
-
8
-
9
-
10
-
11
-
12
-
13
-
14
-
15
-
16
-
17
-
18
-
19
-
20
-
21
-
22
-
23
-
24
-
25
-
26
-
27
-
28
-
29
-
30
-
31
-
32
-
33
-
 34
34 -
 35
35 -
 36
36 -
 37
37 -
 38
38 -
 39
39 -
 40
40 -
 41
41 -
 42
42 -
 43
43 -
 44
44 -
45
-
46
-
47
-
48
-
49
-
50
-
51
-
52
-
53
-
54
-
55
-
56
-
57
-
58
-
59
 |
 |
