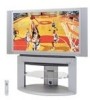
Panasonic 50LCX63 Multi-media Display - Page 53
V Position, Overscan: OFF
 |
View all Panasonic 50LCX63 manuals
Add to My Manuals
Save this manual to your list of manuals |
Page 53 highlights
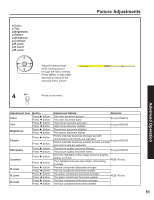
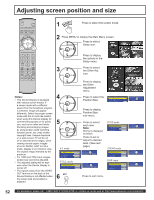
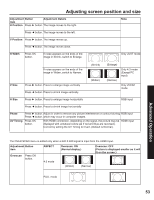
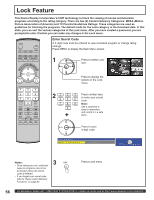
Adjusting screen position and size Adjustment Button Adjustment Details item H Position Press ► button. The image moves to the right. Note Press ◄ button. The image moves to the left. V Position Press ► button. The image moves up. Press ◄ button. The image moves down. H Width Press OK button. If noise appears on the ends of the image in Shrink, switch to Enlarge. Only JUST mode If noise appears on the ends of the image in Widen, switch to Narrow. V Size Press ► button. Press to enlarge image vertically Press ◄ button. Press to shrink image vertically (Shrink) (Widen) (Enlarge) (Narrow) Only 4:3 mode (Except PC input) Only ZOOM mode H Size Press ► button. Press to enlarge image horizontally RGB input Press ◄ button. Press to shrink image horizontally Phase Press ► button. Adjust in order to remove any picture interference or contour blurring RGB input Press ◄ button. which may occur in computer images. UV Timing Press OK button. With HDMI connection, depending on the signal, the picture may be HDMI input displayed with unnatural colors (as if red and blue are reversed). Correct by setting the UV Timing to Invert. (Default is Normal.) Advanced Operation The OVER SCAN menu is added only when a 640 X 480 signal is input from the HDMI Input. Adjustment Button item Overscan Press OK button. ASPECT Overscan: ON (Normal display.) Overscan: OFF (Picture is displayed smaller so it will fit on the screen.) 4:3 mode (Widen) (Narrow) FULL mode 53
-
 1
1 -
2
-
3
-
4
-
5
-
6
-
7
-
8
-
9
-
10
-
11
-
12
-
13
-
14
-
15
-
16
-
17
-
18
-
19
-
20
-
21
-
22
-
23
-
24
-
25
-
26
-
27
-
28
-
29
-
30
-
31
-
32
-
33
-
34
-
35
-
36
-
37
-
38
-
39
-
40
-
41
-
42
-
43
-
44
-
45
-
46
-
47
-
 48
48 -
 49
49 -
 50
50 -
 51
51 -
 52
52 -
 53
53 -
 54
54 -
 55
55 -
 56
56 -
 57
57 -
 58
58 -
59
-
60
-
61
-
62
-
63
-
64
-
65
-
66
-
67
-
68
-
69
-
70
-
71
-
72
-
73
-
74
-
75
-
76
-
77
-
78
-
79
-
80
-
81
-
82
-
83
-
84
-
85
-
86
-
87
-
88
-
89
-
90
-
91
-
92
-
93
-
94
-
95
-
96
-
97
-
98
-
99
-
100
-
101
-
102
-
103
-
104
-
105
-
106
-
107
-
108
 |
 |
