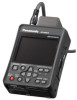
Panasonic AG-HMR10 Operating Instructions - Page 33
SD Memory Cards, Inserting and removing SD Memory Cards, Protecting SD Memory Cards, Cards
 |
View all Panasonic AG-HMR10 manuals
Add to My Manuals
Save this manual to your list of manuals |
Page 33 highlights
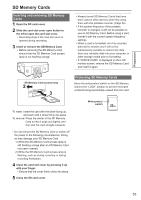
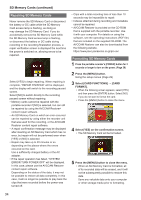
Preparation SD Memory Cards Inserting and removing SD Memory Cards 1 Open the SD card cover. 2 Slide the card slot cover open button to the left to open the card slot cover. • Recording stops if the card slot cover is opened during recording. 3 Insert or remove the SD Memory Card. • Before removing the SD Memory Card, ensure that the SD Memory Card access lamp is not flashing orange. • Always format SD Memory Cards that have been used in other devices when first using them with this portable recorder. (Page 34) • If the system frequency of the portable recorder is changed, it will not be possible to use an SD Memory Card. Before using a card, format it with the current system frequency settings. • When a card is formatted, all of its recorded data will be erased, and it will not be subsequently possible to restore this data. Save any valuable data onto your computer or other storage media prior to formatting. • If "CHECK CARD" is displayed on the LCD monitor screen, remove the SD Memory Card and insert it again. SD Memory Card access lamp 2 3 LOCK 32 To insert: Insert the card with the label facing up, and push until it clicks firmly into place. To remove: Press the center of the SD Memory Card so that it pops out slightly, and then pull the card straight outwards. Protecting SD Memory Cards Move the write-protect switch on the SD Memory Card to the "LOCK" position to prevent recorded contents being accidentally erased from the card. LOCK Write-protect switch 32 • Do not remove the SD Memory Card or switch off the power in the following circumstances. Doing so may damage your SD Memory Card. 1) While the SD Memory Card access lamp is still flashing orange after an SD Memory Card has been inserted. 2) While the SD Memory Card access lamp is flashing, such as during recording or during recording finalization. 4 Close the card slot cover by pressing it up with your finger. • Ensure that the cover firmly clicks into place. 5 Close the SD card cover. 33
-
 1
1 -
2
-
3
-
4
-
5
-
6
-
7
-
8
-
9
-
10
-
11
-
12
-
13
-
14
-
15
-
16
-
17
-
18
-
19
-
20
-
21
-
22
-
23
-
24
-
25
-
26
-
27
-
 28
28 -
 29
29 -
 30
30 -
 31
31 -
 32
32 -
 33
33 -
 34
34 -
 35
35 -
 36
36 -
 37
37 -
 38
38 -
39
-
40
-
41
-
42
-
43
-
44
-
45
-
46
-
47
-
48
-
49
-
50
-
51
-
52
-
53
-
54
-
55
-
56
-
57
-
58
-
59
-
60
-
61
-
62
-
63
-
64
-
65
-
66
-
67
-
68
-
69
-
70
-
71
-
72
-
73
-
74
-
75
-
76
-
77
-
78
-
79
-
80
-
81
-
82
-
83
-
84
-
85
-
86
-
87
-
88
-
89
-
90
-
91
-
92
-
93
-
94
-
95
-
96
-
97
-
98
-
99
-
100
-
101
-
102
-
103
-
104
-
105
-
106
 |
 |
