Panasonic AG-HMR10 Operating Instructions - Page 37
Shooting and recording with a camera (CAM mode), Select [RECORDING SETUP]
 |
View all Panasonic AG-HMR10 manuals
Add to My Manuals
Save this manual to your list of manuals |
Page 37 highlights
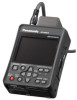
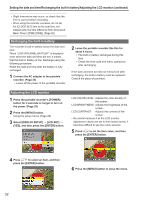
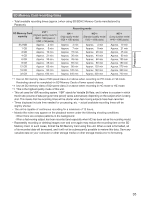
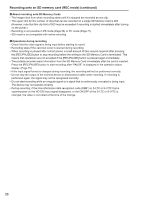
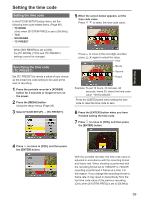
Shooting and recording with a camera (CAM mode) When connected to the AG-HCK10G camera head (optional), you can shoot while operating the camera function with the portable recorder. Portable recorder AG-HCK10G camera head (optional) Camera cable (optional) CAMERA terminal 1 Connect the portable recorder to the camera head with the camera cable, and press the [POWER] button for 2 seconds or longer to turn on the power. The CAM mode screen appears. Indicates the mode TC 12 : 34 : 56 . 00 CAM 112 min P- REC 120 min PH 1080 60 ALC ATW 0dB 24P 1 C H 2 C H 1/60 F F5.6 AF 99 Z00 • If you turn on the power before connecting the camera head, the portable recorder will enter SDI mode and it cannot be changed to CAM mode. If you connect or disconnect the camera head while the portable recorder's power is on, it may cause a malfunction of the portable recorder or camera head. Be sure to turn off the portable recorder's power before connecting or disconnecting the camera head. • If the camera head has an abnormality, such as a malfunction or broken cable, recording is not possible. "SYSTEM ERROR TURN POWER OFF" is displayed on the LCD monitor screen and "CAM" flashes. Recording 2 Press [MENU]. Using the setup menus (Page 29) 3 Select [RECORDING SETUP] → [REC FORMAT], and then press the [ENTER] button or . 4 Press to select the recording format, and then press the [ENTER] button. • The factory default setting for this unit is as follows. For AG-HMR10P: PH mode 1080/60i recording For AG-HMR10E: PH mode 1080/50i recording 5 Press the [REC/PAUSE] button to start shooting. • Shooting is not possible when a menu screen is displayed. First close the menu screen, and then press the [REC/PAUSE] button. • The default setting for focus, iris and shutter speed adjustment is auto. To change the settings, see page 50. • In CAM mode (when connected to AGHCK10G camera head), no audio is output from the built-in speaker. 6 Press the [REC/PAUSE] button to finish shooting. • The portable recorder enters shooting standby. (Continued on the next page) 37
-
 1
1 -
2
-
3
-
4
-
5
-
6
-
7
-
8
-
9
-
10
-
11
-
12
-
13
-
14
-
15
-
16
-
17
-
18
-
19
-
20
-
21
-
22
-
23
-
24
-
25
-
26
-
27
-
28
-
29
-
30
-
31
-
 32
32 -
 33
33 -
 34
34 -
 35
35 -
 36
36 -
 37
37 -
 38
38 -
 39
39 -
 40
40 -
 41
41 -
 42
42 -
43
-
44
-
45
-
46
-
47
-
48
-
49
-
50
-
51
-
52
-
53
-
54
-
55
-
56
-
57
-
58
-
59
-
60
-
61
-
62
-
63
-
64
-
65
-
66
-
67
-
68
-
69
-
70
-
71
-
72
-
73
-
74
-
75
-
76
-
77
-
78
-
79
-
80
-
81
-
82
-
83
-
84
-
85
-
86
-
87
-
88
-
89
-
90
-
91
-
92
-
93
-
94
-
95
-
96
-
97
-
98
-
99
-
100
-
101
-
102
-
103
-
104
-
105
-
106
 |
 |
