Panasonic AG-HMR10 Operating Instructions - Page 63
Thumbnail operations, Selecting the thumbnail display method (THUMBNAIL SETUP)
 |
View all Panasonic AG-HMR10 manuals
Add to My Manuals
Save this manual to your list of manuals |
Page 63 highlights
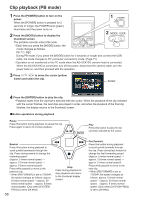
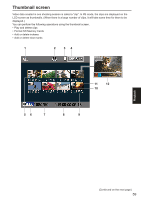
Thumbnail operations Selecting the thumbnail display method (THUMBNAIL SETUP) You can display as thumbnails the type of clips that you want to see. You can also set in detail how you want the thumbnails to appear on the screen. 1 Press the [MENU] button. Using the setup menus (Page 29) 2 Select [THUMBNAIL SETUP], and then press the [ENTER] button or . 3 Press to select an item, and then press the [ENTER] button. INDICATOR: Set whether or not to display the indicators (ON/OFF). (Factory default setting is [ON].) Clip protect display and resume playback display will still appear even if this setting is set to [OFF]. DATA DISPLAY: Select the time display for the clips. TC: Time code UB: User information TIME: Shooting time DATE: Shooting date DATE & TIME: Shooting date and time DATE FORMAT: Select the format of the recording date and time that is displayed when [DATE] is selected in [DATA DISPLAY]. Y-M-D: year/month/day M-D-Y: month/day/year D-M-Y: day/month/year · This setting will not be reflected in CLIP PROPERTY. 4 Press the [MENU] button to return to the thumbnail screen. THUMBNAIL MODE: Select the clips to be displayed. ALL: Display all clips. SAME FORMAT: Display clips of the same format as the format currently set in [PB FORMAT]. MARKER: Display clips with shot marks. INDEX: Display clips with indexes. Playback 63
-
 1
1 -
2
-
3
-
4
-
5
-
6
-
7
-
8
-
9
-
10
-
11
-
12
-
13
-
14
-
15
-
16
-
17
-
18
-
19
-
20
-
21
-
22
-
23
-
24
-
25
-
26
-
27
-
28
-
29
-
30
-
31
-
32
-
33
-
34
-
35
-
36
-
37
-
38
-
39
-
40
-
41
-
42
-
43
-
44
-
45
-
46
-
47
-
48
-
49
-
50
-
51
-
52
-
53
-
54
-
55
-
56
-
57
-
 58
58 -
 59
59 -
 60
60 -
 61
61 -
 62
62 -
 63
63 -
 64
64 -
 65
65 -
 66
66 -
 67
67 -
 68
68 -
69
-
70
-
71
-
72
-
73
-
74
-
75
-
76
-
77
-
78
-
79
-
80
-
81
-
82
-
83
-
84
-
85
-
86
-
87
-
88
-
89
-
90
-
91
-
92
-
93
-
94
-
95
-
96
-
97
-
98
-
99
-
100
-
101
-
102
-
103
-
104
-
105
-
106
 |
 |
