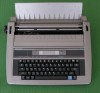
Panasonic KX-R530 Operating Instructions - Page 10
Changing, Correction, Daisywheel
 |
UPC - 037988700851
View all Panasonic KX-R530 manuals
Add to My Manuals
Save this manual to your list of manuals |
Page 10 highlights
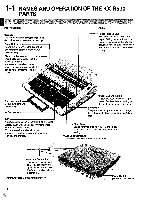
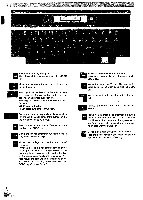
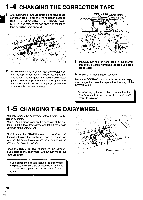
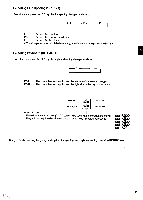
1-4 CHANGING THE CORRECTION TAPE After turning the POWER switch off, to replace the correction tape, lift out the typing ribbon cassette (see "1-3 CHANGING THE RIBBON CASSETTE") and remove the two spools of the lift-off tape by pulling them outward. Left Guide Metal Guides Card Holder Right Guide I 0 Empty U Full Tape Spool_ Tape Spool 6 C Tape Spool Tape Spool 2 Place the empty spool of new tape on the left pin so that the tape winds counter-clockwise. Place the tape around the left guide and behind both metal guides. Pull the tape around the right guide and place the loaded spool on the right pin so that the tape unwinds counter-clockwise. 3 Manually turn the left-hand spool in the counter- clockwise direction, tightening the tape until resistance is felt. 4 Replace the typing ribbon cassette. Press the CODE+K keys to initialize the carriage, if you change the correction tape without turning off the POWER switch. After changing the correction tape, confirm that the correctable (rough) side of the tape faces toward the platen. 1-5 CHANGING THE DAISYWHEEL You can remove the daisywheel without removing the ribbon cassette. You will see a green lever on the right side of the carriage. Pull this lever toward you and lift out the plastic cartridge of the daisywheel. After turning the POWER switch off, to insert the daisywheel, place the plastic cartridge in the carriage with the characters facing toward the platen. Push the green lever back into position. al,3 Press the CODE+K keys to initialize the carriage, if you change the daisywheel without turning off the POWER switch. Green Lever If you experience trouble locking the daisywheel into place, make sure it is pressed down as far as possible. Then, push the locking lever forward again. 10
-
 1
1 -
2
-
3
-
4
-
 5
5 -
 6
6 -
 7
7 -
 8
8 -
 9
9 -
 10
10 -
 11
11 -
 12
12 -
 13
13 -
 14
14 -
 15
15 -
16
-
17
-
18
-
19
-
20
-
21
-
22
-
23
-
24
-
25
-
26
-
27
-
28
-
29
-
30
-
31
-
32
-
33
-
34
-
35
-
36
-
37
-
38
-
39
-
40
-
41
-
42
-
43
-
44
-
45
-
46
-
47
 |
 |
