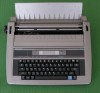
Panasonic KX-R530 Operating Instructions - Page 15
Margins
 |
UPC - 037988700851
View all Panasonic KX-R530 manuals
Add to My Manuals
Save this manual to your list of manuals |
Page 15 highlights
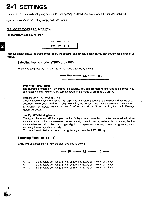
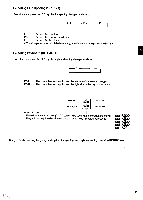
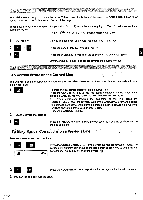
To Set Margins and.Tabs 1 MAR REL Press the CODE+MAR REL keys. Clear the current tabs. Refer to "To Clear All Tabs". 2 SPACE HA, BACK SPACE 3 CODE Press the SPACE BAR or BACKSPACE key to move the carriage to the desired left margin position. If necessary, press the MAR REL key to by-pass a previously set margin. Press the CODE+1 keys to set the left margin. The display will show "L.M. SET" for one second. L.M. SET 4 ',PACE BAR 5® TAB SET Press the SPACE BAR until you reach the first desired TAB stop. Press the TAB SET key to set the first TAB stop. The display will show "TAB SET" for one second. 6 Repeat steps 4 and 5. 7 BACK SPACE 8 CODE -I- R.M. SET Repeat steps 4 and 5 for each desired TAB stop. Remember that the maximum number of TAB stops is 13. Press the SPACE BAR or BACKSPACE key to move the carriage to the desired right margin position. If necessary, press the MAR REL key to by-pass a previously set margin. Press the CODE+2 keys to set the right margin. The display will show "R.M. SET" for one second. 9 Press the RETURN key to move the carriage to the left margin on the next line. Example: Set the margins and tabs as follows: • Set the left margin at 15 e0 Set the first TAB at 30 Set the second TAB at 45 O Set the third TAB at 60 O Set the right margin at 75 The "Hot Zone" is preprogrammed in the machine at 8 spaces from the right margin. When the carriage enters the "Hot Zone", you will hear the buzzer which indicates that the right margin is approaching. 15
-
 1
1 -
2
-
3
-
4
-
5
-
6
-
7
-
8
-
9
-
 10
10 -
 11
11 -
 12
12 -
 13
13 -
 14
14 -
 15
15 -
 16
16 -
 17
17 -
 18
18 -
 19
19 -
 20
20 -
21
-
22
-
23
-
24
-
25
-
26
-
27
-
28
-
29
-
30
-
31
-
32
-
33
-
34
-
35
-
36
-
37
-
38
-
39
-
40
-
41
-
42
-
43
-
44
-
45
-
46
-
47
 |
 |
