Panasonic PTAE4000 Operating Instructions - Page 14
Loading a saved setting, VIERA Link, Adjusting the signal condition with a waveform
 |
View all Panasonic PTAE4000 manuals
Add to My Manuals
Save this manual to your list of manuals |
Page 14 highlights
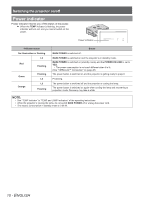
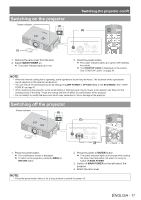
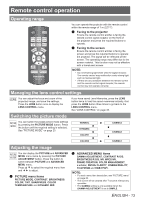
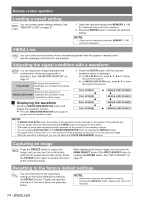
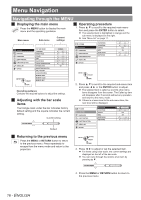
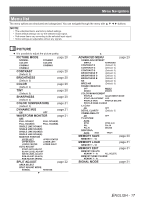
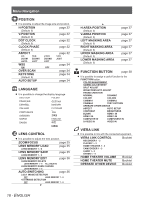
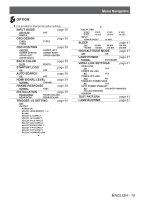
Remote control operation Loading a saved setting You can access saved settings instantly. See "MEMORY LOAD" on page 31. 111 Select the required setting from MEMORY 1 - 16. Undefined setting will not be displayed. 222 Press the ENTER button to activate the selected setting. NOTE: •• If you have not saved any settings, MEMORY 1 - 16 will not be displayed. VIERA Link You can control some functions of the connected equipment with this projector remote control. See the operating instructions for more details. Adjusting the signal condition with a waveform You can display the image brightness and contrast level of the input signal with a waveform. See "WAVEFORM MONITOR" on page 21. FULL SCAN Monitoring the waveform of brightness and contrast of the whole image. Monitoring the waveform of SINGLE LINE SCAN brightness and contrast in each horizontal line of the image. 222 Press the ENTER button until the required waveform option is displayed. In FULL SCAN mode, press to change the waveform position. In SINGLE LINE SCAN mode, press ▲ ▼ to select the required line position. FULL SCAN(Y) SINGLE LINE SCAN(B) FULL SCAN(R) SINGLE LINE SCAN(G) JJ Displaying the waveform 111 Press the WAVEFORM MONITOR button and display the waveform monitor. Press the WAVEFORM MONITOR button again to escape from the waveform mode. FULL SCAN(G) FULL SCAN(B) SINGLE LINE SCAN(R) SINGLE LINE SCAN(Y) NOTE: •• In SINGLE LINE SCAN mode, the position of the waveform monitor depends on the position of the selected line. •• You can display the main menu by pressing the MENU button and adjust the menu items. •• The called up menu items displayed position depends on the position of the waveform monitor. •• You can activate AUTO ADJUST of the WAVEFORM MONITOR menu by pressing the DEFAULT button. •• The signal which is lower than 0 % in the waveform will be displayed as same as 0 % on the projected image. •• While the waveform is displayed, you can not adjust the COLOR MANAGEMENT settings. Capturing an image Press the FREEZE button to capture the image, and you can see it as a still picture while the AV equipment are still running. Press the FREEZE button again to escape and return to the continuing image. While displaying the frozen image, you can enter the AREA SELECT mode of the SPLIT ADJUST menu by pressing the ENTER button. See "SPLIT ADJUST" on page 22. Resetting to the factory default settings You can reset most of the customized settings to the factory defaults by pressing the DEFAULT button. Display the required sub‑menu or the menu items and press the button. NOTE: •• Some menu items are not available to reset by pressing the DEFAULT button. Adjust each menu item manually. 14 - ENGLISH
-
 1
1 -
2
-
3
-
4
-
5
-
6
-
7
-
8
-
 9
9 -
 10
10 -
 11
11 -
 12
12 -
 13
13 -
 14
14 -
 15
15 -
 16
16 -
 17
17 -
 18
18 -
 19
19 -
20
-
21
-
22
-
23
-
24
-
25
-
26
-
27
-
28
-
29
-
30
-
31
-
32
-
33
-
34
-
35
-
36
-
37
-
38
-
39
-
40
-
41
-
42
-
43
-
44
-
45
-
46
-
47
-
48
-
49
-
50
 |
 |
