Panasonic PTAE4000 Operating Instructions - Page 39
Option Menu, Input Guide, Osd Design, Osd Position, Back Color, Startup Logo, Auto Search
 |
View all Panasonic PTAE4000 manuals
Add to My Manuals
Save this manual to your list of manuals |
Page 39 highlights
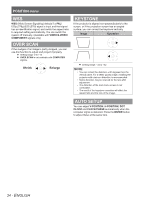
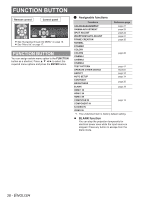
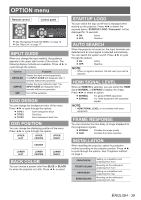
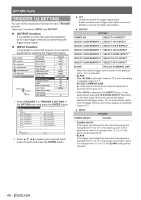
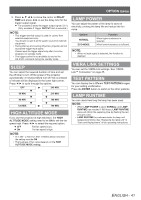
OPTION menu Remote control Control panel See "Navigating through the MENU" on page 16. See "Menu list" on page 17. INPUT GUIDE When you change the input method, the guidance appears in the upper right corner of the screen. The following display methods are available. Press ◄ ► to cycle through the options. Options DETAILED SIMPLE OFF Function Display the input method graphically. The INPUT GUIDE will disappear after 3 seconds without any operation. Display the input method by text. The INPUT GUIDE will disappear after 3 seconds without any operation. Turn off the guidance. OSD DESIGN You can change the background color of the menu. Press ◄ ► to cycle through the options. TYPE1 Semi transparent black TYPE2 Solid blue TYPE3 Semi transparent dark blue OSD POSITION You can change the displaying position of the menu. Press ◄ ► to cycle through the options. UPPER LEFT UPPER CENTER UPPER RIGHT CENTER LOWER LEFT LOWER CENTER LOWER RIGHT BACK COLOR You can choose a screen color from BLUE or BLACK for when the projector is in idle. Press ◄ ► to select. STARTUP LOGO You can switch the logo on/off that is displayed when starting up the projector. Press ◄ ► to select the required option. STARTUP LOGO "Panasonic" will be displayed for 15 seconds. ON: Active OFF: Deactive AUTO SEARCH When the projector is turned on, the input terminals are detected and an input signal is selected automatically. You can switch the system on/off. Press ◄ ► to cycle through the options. ON: OFF: Active Deactive NOTE: •• When no signal is detected, the last used input will be selected. HDMI SIGNAL LEVEL When an HDMI IN is selected, you can switch the HDMI signal NORMAL or EXPAND to display the image. Press ◄ ► to select an option. NORMAL EXPAND For general HDMI equipment For HDMI equipment with expanded signals. NOTE: •• HDMI SIGNAL LEVEL is not available with some equipment. FRAME RESPONSE You can minimise the time delay of image displayed for the progressive signals. NORMAL FAST Prioritise the image quality Prioritise the frame response INSTALLATION When installing the projector, select the projection method according to the projector position. Press ◄ ► to cycle through the options. See "Projection method" on page 5. FRONT/DESK FRONT/CEILING REAR/DESK REAR/CEILING Setting on a desk/floor and projecting from front Mounting on the ceiling and projecting from front Setting on a desk/floor and projecting from rear Mounting on the ceiling and projecting from rear ENGLISH - 39
-
 1
1 -
2
-
3
-
4
-
5
-
6
-
7
-
8
-
9
-
10
-
11
-
12
-
13
-
14
-
15
-
16
-
17
-
18
-
19
-
20
-
21
-
22
-
23
-
24
-
25
-
26
-
27
-
28
-
29
-
30
-
31
-
32
-
33
-
 34
34 -
 35
35 -
 36
36 -
 37
37 -
 38
38 -
 39
39 -
 40
40 -
 41
41 -
 42
42 -
 43
43 -
 44
44 -
45
-
46
-
47
-
48
-
49
-
50
 |
 |
