Panasonic PTAE4000 Operating Instructions - Page 22
Split Adjust, Picture Menu
 |
View all Panasonic PTAE4000 manuals
Add to My Manuals
Save this manual to your list of manuals |
Page 22 highlights
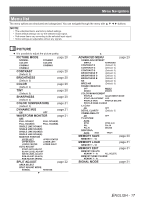
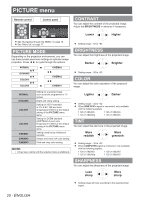
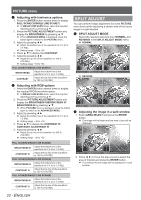
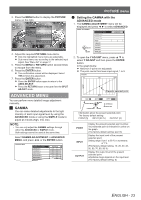
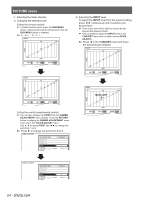
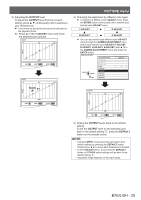
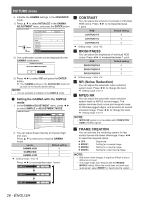
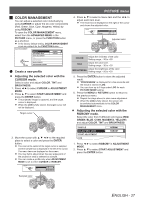
PICTURE menu QQ Adjusting with luminance options 111 Press the ENTER button several times to display FULL SCAN(Y)/SINGLE LINE SCAN(Y). In SINGLE LINE SCAN mode, select the required adjusting point by pressing ▲ ▼. 222 Press the PICTURE ADJUSTMENT button and display the BRIGHTNESS by pressing ▲ ▼. When ADVANCED MENU is displayed, press the button again to switch to the PICTURE menu. 333 Adjust by pressing ◄ ►. Adjust the bottom line of the waveform to 0 % (0 or 7.5 IRE). Setting range: −32 to +32 444 Press ▲ ▼ to display the CONTRAST. 555 Adjust by pressing ◄ ►. Adjust the up line of the waveform to 100 % (100 IRE). Setting range: −64 to +64 FULL SCAN(Y)/SINGLE LINE SCAN(Y) BRIGHTNESS Adjust the bottom line of the waveform to 0 % (0 or 7.5 IRE) CONTRAST Adjust the top line of the waveform to 100 % (100 IRE) SPLIT ADJUST You can perform image adjustment for some PICTURE menu items while displaying a certain area of the frozen image in a split window. QQ SPLIT ADJUST MODE Select the required split style from NORMAL and REVERSE in the SPLIT ADJUST MODE menu. NORMAL MOVE AREA ENTER GO TO SPLIT ADJUST RETURN GO TO FREEZE SCREEN REVERSE QQ Adjusting with RGB options 111 Press the ENTER button several times to display the required R/G/B waveform option. In SINGLE LINE SCAN mode, select the required adjusting point by pressing ▲ ▼. 222 Press the PICTURE ADJUSTMENT button and display the BRIGHTNESS R/BRIGHTNESS G/ BRIGHTNESS B by pressing ▲ ▼. When PICTURE menu is displayed, press the button again to switch to the ADVANCED MENU. 333 Adjust by pressing ◄ ►. Adjust the bottom line of the waveform to 0 % (0 or 7.5 IRE). Setting range: −16 to +16 444 Press ▲ ▼ to display the CONTRAST R/ CONTRAST G/CONTRAST B. 555 Adjust by pressing ◄ ►. Adjust the up line of the waveform to 100 % (100 IRE). Setting range: −32 to +32 MOVE AREA ENTER GO TO SPLIT ADJUST RETURN GO TO FREEZE SCREEN QQ Adjusting the image in a split window 111 Select AREA SELECT and press the ENTER button. The image will be frozen and the area cursor will be displayed. FULL SCAN(R)/SINGLE LINE SCAN(R) BRIGHTNESS R Adjust the bottom line of the waveform to 0 % (0 or 7.5 IRE) CONTRAST R Adjust the top line of the waveform to 100 % (100 IRE) FULL SCAN(G)/SINGLE LINE SCAN(G) BRIGHTNESS G Adjust the bottom line of the waveform to 0 % (0 or 7.5 IRE) CONTRAST G Adjust the top line of the waveform to 100 % (100 IRE) FULL SCAN(B)/SINGLE LINE SCAN(B) BRIGHTNESS B Adjust the bottom line of the waveform to 0 % (0 or 7.5 IRE) CONTRAST B Adjust the top line of the waveform to 100 % (100 IRE) MOVE AREA ENTER GO TO SPLIT ADJUST RETURN GO TO FREEZE SCREEN 222 Press ◄ ► to move the area cursor to select the area of interest and press the ENTER button. The selected frozen image will be displayed in a split window. 22 - ENGLISH
-
 1
1 -
2
-
3
-
4
-
5
-
6
-
7
-
8
-
9
-
10
-
11
-
12
-
13
-
14
-
15
-
16
-
 17
17 -
 18
18 -
 19
19 -
 20
20 -
 21
21 -
 22
22 -
 23
23 -
 24
24 -
 25
25 -
 26
26 -
 27
27 -
28
-
29
-
30
-
31
-
32
-
33
-
34
-
35
-
36
-
37
-
38
-
39
-
40
-
41
-
42
-
43
-
44
-
45
-
46
-
47
-
48
-
49
-
50
 |
 |
