Panasonic PTAE4000 Operating Instructions - Page 36
LENS MEMORY EDIT, AUTO SWITCHING, Deleting a memory setting, Changing the name of the memory, setting
 |
View all Panasonic PTAE4000 manuals
Add to My Manuals
Save this manual to your list of manuals |
Page 36 highlights
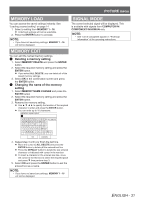
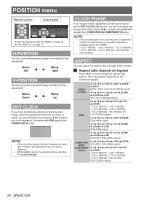
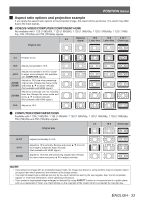
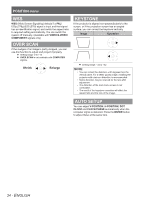
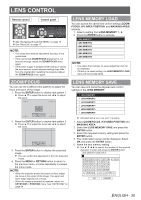
LENS CONTROL 666 Repeat step 5 until you finish the text line. You can enter up to 16 characters. Move the cursor to ALL DELETE and press the ENTER button to delete all the entered text line. Press the DEFAULT button to delete the last entered character or indicted with the cursor in the text box. To insert a character in the entered text line, move the cursor to the text box to select the required place and press ▼ then perform step 5. 777 Select OK and press the ENTER button to set the entered text as a name. NOTE: •• If you leave the text box empty and save, the default memory number will stay as a name. LENS MEMORY EDIT You can edit saved lens memory settings. QQ Deleting a memory setting 111 Select LENS MEMORY DELETE and press the ENTER button. 222 Select the required lens memory setting and press the ENTER button. 333 If you select ALL DELETE, you can delete all of the saved lens memory settings. 444 Select OK in the confirmation screen and press the ENTER button. QQ Changing the name of the memory setting 111 Select LENS MEMORY NAME CHANGE and press the ENTER button. 222 Select the required lens memory setting and press the ENTER button. 333 Rename the lens memory setting. Use to specify the location of the required character to enter and press the ENTER button. 444 Repeat step 3 until you finish the text line. You can enter up to 16 characters. Move the cursor to ALL DELETE and press the ENTER button to delete all the entered text line. Press the DEFAULT button to delete the last entered character or indicted with the cursor in the text box. To insert a character in the entered text line, move the cursor to the text box to select the required place and press ▼ then perform step 3. 555 Select OK and press the ENTER button to set the entered text as a name. NOTE: •• The option that contains no saved adjustment will not be displayed •• If you leave the text box empty and save, the default memory name will stay as a name. AUTO SWITCHING You can automatically load the saved lens memory settings which are set for each screen size. This function is able to identify the wide signal* or 16:9/4:3 and recalls the lens memory settings automatically. ** Wide signal includes: 2.35:1, 2.40:1, 2.50:1, 2.55:1 Press the ENTER button to display the AUTO SWITCH menu. AUTO SWITCHING 2.35:1 IMAGE DETECTION OFF SELECT 16:9 IMAGE DETECTION OFF RETURN 111 Press ▲ ▼ to select the IMAGE DETECTION in the AUTO SWITCH menu. 222 Press ◄ ► to select your required LENS MEMORY for AUTO SWITCHING. The LENS MEMORY setting which has been selected for 2.35:1 IMAGE DETECTION is loaded after a given period of time once the input signal switches from 16:9/4:3 to 2.35:1. The LENS MEMORY setting which has been selected for 16:9 IMAGE DETECTION is loaded after a given period of time once the input signal switches from 2.35:1 to 16:9/4:3. Only saved LENS MEMORY data will appear in the IMAGE DETECTION item. If OFF, the auto-identify will not be performed. When selecting the ZOOM/ZOOM1/ZOOM2/V-HIT in the ASPECT setting, this function will be invalid. When displaying the menu or test pattern, also when performing the PICTURE menu, auto-identify will be invalid. NOTE: In the following conditions, it might take longer to identify or it might be unable to identify the correct image. •• If there is noise in the picture or external equipment generate noise, or depends on the picture images. •• If the input signal level from the external equipment is not set to the suggested value range. Please adjust the WAVEFORM MONITOR settings. See page 21. •• If the screen position is not adjusted well. Please adjust the POSITION settings. See page 32. 36 - ENGLISH
-
 1
1 -
2
-
3
-
4
-
5
-
6
-
7
-
8
-
9
-
10
-
11
-
12
-
13
-
14
-
15
-
16
-
17
-
18
-
19
-
20
-
21
-
22
-
23
-
24
-
25
-
26
-
27
-
28
-
29
-
30
-
 31
31 -
 32
32 -
 33
33 -
 34
34 -
 35
35 -
 36
36 -
 37
37 -
 38
38 -
 39
39 -
 40
40 -
 41
41 -
42
-
43
-
44
-
45
-
46
-
47
-
48
-
49
-
50
 |
 |
