Panasonic PTAE4000 Operating Instructions - Page 2
Contents, Getting Started, Basic Operation
 |
View all Panasonic PTAE4000 manuals
Add to My Manuals
Save this manual to your list of manuals |
Page 2 highlights
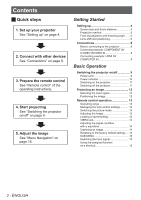
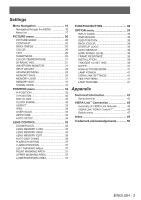
Contents JJQuick steps 11 Set up your projector See "Setting up" on page 4. 22 Connect with other devices See "Connections" on page 8. 33 Prepare the remote control See "Remote control" of the operating instructions. 44 Start projecting See "Switching the projector on/off" on page 9. 55 Adjust the image See "Menu Navigation" on page 16. Getting Started Setting up 4 Screen size and throw distance 4 Projection method 5 Front leg adjusters and throwing angle........ 5 Lens shift and positioning 6 Connections 8 Before connecting to the projector 8 Connecting example: COMPONENT IN/ S-VIDEO IN/VIDEO IN 8 Connecting example: HDMI IN/ COMPUTER IN 8 Basic Operation Switching the projector on/off 9 Power cord 9 Power indicator 10 Switching on the projector 11 Switching off the projector 11 Projecting an image 12 Selecting the input signal 12 Positioning the image 12 Remote control operation 13 Operating range 13 Managing the lens control settings 13 Switching the picture mode 13 Adjusting the image 13 Loading a saved setting 14 VIERA Link 14 Adjusting the signal condition with a waveform 14 Capturing an image 14 Resetting to the factory default settings..... 14 SUB MENU 15 Switching the input signal 15 Using the assigned function as a shortcut 15 2 - ENGLISH
-
 1
1 -
 2
2 -
 3
3 -
 4
4 -
 5
5 -
 6
6 -
 7
7 -
 8
8 -
9
-
10
-
11
-
12
-
13
-
14
-
15
-
16
-
17
-
18
-
19
-
20
-
21
-
22
-
23
-
24
-
25
-
26
-
27
-
28
-
29
-
30
-
31
-
32
-
33
-
34
-
35
-
36
-
37
-
38
-
39
-
40
-
41
-
42
-
43
-
44
-
45
-
46
-
47
-
48
-
49
-
50
 |
 |
