Panasonic VDRM55PP Dvd Video Camera-oem - Page 141
Installing DVDfunSTUDIO
 |
View all Panasonic VDRM55PP manuals
Add to My Manuals
Save this manual to your list of manuals |
Page 141 highlights
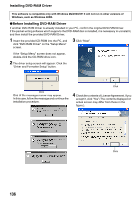
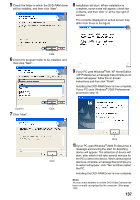
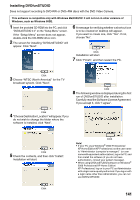
Installing DVDfunSTUDIO Does not support recording to DVD-RW or DVD+RW discs with the DVD Video Camera. This software is compatible only with Windows Me/2000/XP. It will not run in other versions of Windows, such as Windows 98SE. 1 Insert the provided CD-ROM into the PC, and click "DVDfunSTUDIO 2.2" on the "Setup Menu" screen. If the "Setup Menu" screen does not appear, double-click the CD-ROM drive icon. 2 The screen for installing "DVDfunSTUDIO" will appear. Click "Next". 6 A message for verifying whether a shortcut icon is to be created on desktop will appear. If you want to create one, click "Yes". If not, choose "No". Click Installation will start. 7 Click "Finish", and then restart the PC. Click 3 Choose "NTSC (North America)" for the TV broadcast system. Click "Next". Click 8 The following window is displayed during the first run of DVDfunSTUDIO after installation. Carefully read the Software License Agreement. If you accept it, click "I agree". Click 4 "Choose Destination Location" will appear. If you do not wish to change the folder where the software is installed, click "Next". Click 5 Check the contents, and then click "Install". Installation will start. Click Click Note: • If your PC uses Windows® 2000 Professional/ XP Home Edition/XP Professional, set the user name to "Administrator (computer's manager)" (or user name with equivalent authorization), log on to PC, and then install the software (if you do not have authorization, consult your system manager). • When using DVDfunSTUDIO software on Windows® 2000 Professional/XP Home Edition/ XP Professional, log on to your PC as Administrator with a login name equally authorized. If you log on with a login name other than Administrator, you can not use DVDfunSTUDIO. 141
-
 1
1 -
2
-
3
-
4
-
5
-
6
-
7
-
8
-
9
-
10
-
11
-
12
-
13
-
14
-
15
-
16
-
17
-
18
-
19
-
20
-
21
-
22
-
23
-
24
-
25
-
26
-
27
-
28
-
29
-
30
-
31
-
32
-
33
-
34
-
35
-
36
-
37
-
38
-
39
-
40
-
41
-
42
-
43
-
44
-
45
-
46
-
47
-
48
-
49
-
50
-
51
-
52
-
53
-
54
-
55
-
56
-
57
-
58
-
59
-
60
-
61
-
62
-
63
-
64
-
65
-
66
-
67
-
68
-
69
-
70
-
71
-
72
-
73
-
74
-
75
-
76
-
77
-
78
-
79
-
80
-
81
-
82
-
83
-
84
-
85
-
86
-
87
-
88
-
89
-
90
-
91
-
92
-
93
-
94
-
95
-
96
-
97
-
98
-
99
-
100
-
101
-
102
-
103
-
104
-
105
-
106
-
107
-
108
-
109
-
110
-
111
-
112
-
113
-
114
-
115
-
116
-
117
-
118
-
119
-
120
-
121
-
122
-
123
-
124
-
125
-
126
-
127
-
128
-
129
-
130
-
131
-
132
-
133
-
134
-
135
-
 136
136 -
 137
137 -
 138
138 -
 139
139 -
 140
140 -
 141
141 -
 142
142 -
 143
143 -
 144
144 -
 145
145 -
 146
146 -
147
-
148
-
149
-
150
-
151
-
152
-
153
-
154
-
155
-
156
-
157
-
158
-
159
-
160
-
161
-
162
-
163
-
164
-
165
-
166
-
167
-
168
-
169
-
170
 |
 |
