Panasonic VDRM55PP Dvd Video Camera-oem - Page 46
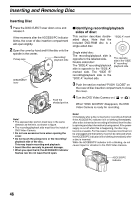
INSERTING AND REMOVING DISC, Inserting Disc, Identifying recording/playback, sides of disc
 |
View all Panasonic VDRM55PP manuals
Add to My Manuals
Save this manual to your list of manuals |
Page 46 highlights
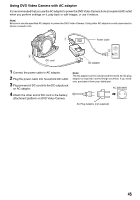
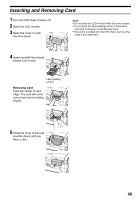
Inserting and Removing Disc Inserting Disc 1 Press the DISC EJECT lever down once and release it. A few moments after the ACCESS/PC indicator blinks, the cover of disc insertion compartment will open slightly. 2 Open the cover by hand and fit the disc onto the spindle in the center. Pickup lens Recording/ playback side DISC EJECT lever Push the shaded portion. lIdentifying recording/playback sides of disc: This section describes doublesided discs. Note that the included DVD-RAM disc is a single-sided disc. "SIDE A" mark DVD-RAM / SIDE A Single sided disc: The recording/playback side is opposite to the labelled side. Double-sided disc: The "SIDE A" recording/playback side is opposite to the "SIDE A" marked side. The "SIDE B" recording/playback side is the "SIDE A" marked side. The opposite side is the "SIDE A" recording/ playback side. 3 Push the section marked "PUSH CLOSE" on the cover of disc insertion compartment, to close the cover. 4 Turn the DVD Video Camera on ( or ). When "DISC ACCESS" disappears, the DVD Video Camera is ready for recording. Note: • The exposed disc portion must face in the same direction as the lens, as shown in figure. • The recording/playback side must face the inside of DVD Video Camera. • Do not use excessive force when opening the cover. • Do not touch the pickup lens or the recording/ playback side of the disc. This may impair recording and playback. • Insert the disc securely to prevent damage. • When you open the lid, the ACCESS/PC indicator flashes red. Do not leave the lid open. Note: Immediately after a disc is inserted or recording is finished: If the ACCESS/PC indicator is lit or blinking immediately after a disc is inserted or recording is finished, then the disc is spinning and disc information is being saved. If the power supply is cut off while this is happening, the disc may become unusable. For this reason, the power cord must not be unplugged and the battery must not be removed when the ACCESS/PC indicator is lit or blinking immediately after a disc is inserted. While the ACCESS/PC indicator is lit or blinking, do not cause impact or vibration to the DVD Video Camera. ACCESS/PC indicator 46
-
 1
1 -
2
-
3
-
4
-
5
-
6
-
7
-
8
-
9
-
10
-
11
-
12
-
13
-
14
-
15
-
16
-
17
-
18
-
19
-
20
-
21
-
22
-
23
-
24
-
25
-
26
-
27
-
28
-
29
-
30
-
31
-
32
-
33
-
34
-
35
-
36
-
37
-
38
-
39
-
40
-
 41
41 -
 42
42 -
 43
43 -
 44
44 -
 45
45 -
 46
46 -
 47
47 -
 48
48 -
 49
49 -
 50
50 -
 51
51 -
52
-
53
-
54
-
55
-
56
-
57
-
58
-
59
-
60
-
61
-
62
-
63
-
64
-
65
-
66
-
67
-
68
-
69
-
70
-
71
-
72
-
73
-
74
-
75
-
76
-
77
-
78
-
79
-
80
-
81
-
82
-
83
-
84
-
85
-
86
-
87
-
88
-
89
-
90
-
91
-
92
-
93
-
94
-
95
-
96
-
97
-
98
-
99
-
100
-
101
-
102
-
103
-
104
-
105
-
106
-
107
-
108
-
109
-
110
-
111
-
112
-
113
-
114
-
115
-
116
-
117
-
118
-
119
-
120
-
121
-
122
-
123
-
124
-
125
-
126
-
127
-
128
-
129
-
130
-
131
-
132
-
133
-
134
-
135
-
136
-
137
-
138
-
139
-
140
-
141
-
142
-
143
-
144
-
145
-
146
-
147
-
148
-
149
-
150
-
151
-
152
-
153
-
154
-
155
-
156
-
157
-
158
-
159
-
160
-
161
-
162
-
163
-
164
-
165
-
166
-
167
-
168
-
169
-
170
 |
 |
