Panasonic VDRM55PP Dvd Video Camera-oem - Page 52
Recording Stills
 |
View all Panasonic VDRM55PP manuals
Add to My Manuals
Save this manual to your list of manuals |
Page 52 highlights
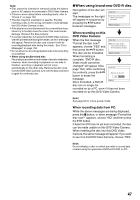
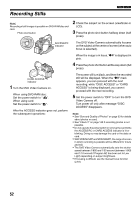
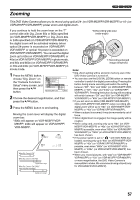
Recording Stills 13 Note: Recording of still images is possible on DVD-RAM disc and card. Photo shot button 2 Check the subject on the screen (viewfinder or LCD). 3 Press the photo shot button halfway down (half press). ACCESS/PC indicator The DVD Video Camera automatically focuses on the subject at the center of screen (when auto focus is selected). When the image is in focus, "m" is displayed in pink. 4 Press the photo shot button all the way down (full press). CARD ACCESS indicator 1 Turn the DVD Video Camera on. When using DVD-RAM disc: Set the power switch to " ". When using card: Set the power switch to " ". After the ACCESS indicator goes out, perform the subsequent operations: The screen will turn black, and then the recorded still will be displayed. When the "m" mark appears, you can proceed with the next recording; while "DISC ACCESS" or "CARD ACCESS" is being displayed, you cannot proceed with the next recording. 5 Set the power switch to "OFF" to turn the DVD Video Camera off. Turn power off only after message "DISC ACCESS" disappears. Note: • See "Size and Quality of Photos" on page 33 for details about photos on card. • See "Check 2" on page 149 if recording photos is not possible. • Do not operate the power switch or remove the card while the ACCESS/PC or CARD ACCESS indicator is lit or blinking. Doing so may damage the card or the data on card. • With VDR-M75PP and VDR-M95PP, the range of screen in which recording is possible will be different for movie and still. • The DVD Video Camera automatically sets the shutter speed between 1/800 and 1/30 second (between 1/800 and 1/10 second if Program AE has been set to Low Light) depending on subject brightness. • If focusing is difficult, use the manual focus function (p.64). 52
-
 1
1 -
2
-
3
-
4
-
5
-
6
-
7
-
8
-
9
-
10
-
11
-
12
-
13
-
14
-
15
-
16
-
17
-
18
-
19
-
20
-
21
-
22
-
23
-
24
-
25
-
26
-
27
-
28
-
29
-
30
-
31
-
32
-
33
-
34
-
35
-
36
-
37
-
38
-
39
-
40
-
41
-
42
-
43
-
44
-
45
-
46
-
 47
47 -
 48
48 -
 49
49 -
 50
50 -
 51
51 -
 52
52 -
 53
53 -
 54
54 -
 55
55 -
 56
56 -
 57
57 -
58
-
59
-
60
-
61
-
62
-
63
-
64
-
65
-
66
-
67
-
68
-
69
-
70
-
71
-
72
-
73
-
74
-
75
-
76
-
77
-
78
-
79
-
80
-
81
-
82
-
83
-
84
-
85
-
86
-
87
-
88
-
89
-
90
-
91
-
92
-
93
-
94
-
95
-
96
-
97
-
98
-
99
-
100
-
101
-
102
-
103
-
104
-
105
-
106
-
107
-
108
-
109
-
110
-
111
-
112
-
113
-
114
-
115
-
116
-
117
-
118
-
119
-
120
-
121
-
122
-
123
-
124
-
125
-
126
-
127
-
128
-
129
-
130
-
131
-
132
-
133
-
134
-
135
-
136
-
137
-
138
-
139
-
140
-
141
-
142
-
143
-
144
-
145
-
146
-
147
-
148
-
149
-
150
-
151
-
152
-
153
-
154
-
155
-
156
-
157
-
158
-
159
-
160
-
161
-
162
-
163
-
164
-
165
-
166
-
167
-
168
-
169
-
170
 |
 |
