Panasonic WJHD316 WJHD309 User Guide - Page 114
Time & Date Display Position, Camera Title Display Position, Line Colour on the Multi Screen
 |
View all Panasonic WJHD316 manuals
Add to My Manuals
Save this manual to your list of manuals |
Page 114 highlights
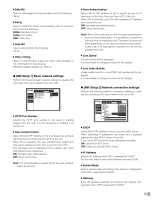
3. Move the cursor to "OK" using the arrows button and press the SET button. The camera title will be copied. • The following characters can be entered for a camera title: 0 1 2 3 4 5 6 7 8 9 A B C D E F G H I J K L M N O P Q R S T U V W X Y Z a b c d e f g h i j k l m n o p q r s t u v w x y z SP [Screenshot 4] The camera title is entered. SETUP MENU Maintenance Switcher Recording Display Event Comm OSD Setup Monitor 1 Monitor 2 I Camera Title CIAMT1ime &CDAaMte1 Display Position CIAMC2ameraETNiTtlReADNiCsEplay Position CIAML3ine CoCloArMo3n the Multi Screen CAM4 CAM4 CAM5 CAM5 CAM6 CAM6 CAM7 CAM7 CAM8 CAM8 Schedule System SETUP L-UPPER R-LOWER WHITE LIVE OK CANCEL SETUP MENU Maintenance Switcher Recording Display Event Comm OSD Setup Monitor 1 Monitor 2 I Camera Title CIAMT9ime &CDAaMte9 Display Position CIAMC1a0meraCTAiMtl1e0Display Position CIAML1in1 e CoCloArMo11n the Multi Screen CAM12 CAM12 CAM13 CAM13 CAM14 CAM14 CAM15 CAM15 CAM16 CAM16 Schedule System SETUP L-UPPER R-LOWER WHITE LIVE OK CANCEL b Press the arrows button to move the cursor to "OK" and press the SET button. → The camera title will be set and the setting window of the camera title will be closed. Notes: • If you move the cursor to "CANCEL" in step 5 and press the SET button, the setting will be canceled and the setting window of the camera title will be closed. • It is possible to set "Camera Title [Display]" to display a camera title on monitor 2 and "Camera Title [Embedded]" to embed/display a camera title on monitor 1 individually using a PC via a network. Refer to the Network Setup Instruction (PDF) for further information. 8 Time & Date Display Position Select a time and date display position from the following. L-UPPER: Displays the time at the upper left of the screen. R-UPPER: Displays the time at the upper right of the screen. L-LOWER: Displays the time at the lower left of the screen. R-LOWER: Displays the time at the lower right of the screen. Notes: • When setting the time and date to be recorded together with images, the time display will be recorded in the selected position. • Refer to page 98 for further information about "Embedded REC (Time & Date)". 8 Camera Title Display Position Select a camera title display position from the following. L-UPPER: Displays the camera title at the upper left of the screen. L-LOWER: Displays the camera title at the lower left of the screen. R-UPPER: Displays the camera title at the upper right of the screen. R-LOWER: Displays the camera title at the lower right of the screen. CENTRE: Displays the camera title at the centre of the screen. Note: When setting the camera title to be recorded together with images, the time display will be embedded in the selected position. Refer to page 98 for further information about "Embedded REC (title)". 8 Line Colour on the Multi Screen Select a line colour from the following. WHITE: Displays white lines. GREY: Displays grey lines. BLACK: Displays black lines. G [Monitor 1] Settings on monitor 1 display Select ON and OFF whether or not to display the time, camera title and alarm display on monitor 1. SETUP MENU Maintenance Switcher Recording Display Event Comm OSD Setup Monitor 1 Monitor 2 I Time & Date Display I Camera Title Display I Alarm Display Schedule System ON ON ON LIVE 8 Time & Date Display Select ON and OFF whether or not to display the time. ON: Displays time. OFF: Does not function. 114
-
 1
1 -
2
-
3
-
4
-
5
-
6
-
7
-
8
-
9
-
10
-
11
-
12
-
13
-
14
-
15
-
16
-
17
-
18
-
19
-
20
-
21
-
22
-
23
-
24
-
25
-
26
-
27
-
28
-
29
-
30
-
31
-
32
-
33
-
34
-
35
-
36
-
37
-
38
-
39
-
40
-
41
-
42
-
43
-
44
-
45
-
46
-
47
-
48
-
49
-
50
-
51
-
52
-
53
-
54
-
55
-
56
-
57
-
58
-
59
-
60
-
61
-
62
-
63
-
64
-
65
-
66
-
67
-
68
-
69
-
70
-
71
-
72
-
73
-
74
-
75
-
76
-
77
-
78
-
79
-
80
-
81
-
82
-
83
-
84
-
85
-
86
-
87
-
88
-
89
-
90
-
91
-
92
-
93
-
94
-
95
-
96
-
97
-
98
-
99
-
100
-
101
-
102
-
103
-
104
-
105
-
106
-
107
-
108
-
 109
109 -
 110
110 -
 111
111 -
 112
112 -
 113
113 -
 114
114 -
 115
115 -
 116
116 -
 117
117 -
 118
118 -
 119
119 -
120
-
121
-
122
-
123
-
124
-
125
-
126
-
127
-
128
-
129
-
130
-
131
-
132
-
133
-
134
-
135
-
136
-
137
-
138
-
139
-
140
-
141
-
142
-
143
-
144
-
145
-
146
-
147
-
148
-
149
-
150
-
151
-
152
-
153
-
154
-
155
-
156
-
157
-
158
-
159
-
160
-
161
-
162
-
163
-
164
 |
 |
