Panasonic WJHD316 WJHD309 User Guide - Page 93
Basic Operation with the SETUP MENU, Pop-up display of the setting item
 |
View all Panasonic WJHD316 manuals
Add to My Manuals
Save this manual to your list of manuals |
Page 93 highlights
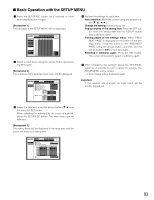
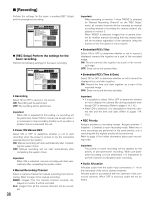
I Basic Operation with the SETUP MENU z Press the SETUP/ESC button for 2 seconds or more when displaying live images. [Screenshot 1] The top page of the SETUP MENU will be displayed. SET UP MENU Maintenance Recording Switcher Display Event Comm Schedule System REC Rate Disk Info Version Info Disk End Mode Disk Capacity Date Delete Event Log Error Log Access Log CAM 1 CAM 2 CAM 3 CAM 4 CAM 5 CAM 6 CAM 7 CAM 8 CAM 9 CAM 10 CAM 11 CAM 12 CAM 13 CAM 14 CAM 15 CAM 16 MANU AUTO AUTO AUTO AUTO AUTO AUTO AUTO AUTO AUTO AUTO AUTO AUTO AUTO AUTO AUTO AUTO SCHE 1ips 1ips 1ips 1ips 1ips 1ips 1ips 1ips 1ips 1ips 1ips 1ips 1ips 1ips 1ips 1ips PRE EVT POST EVT 1ips 1ips 1ips 1ips 1ips 1ips 1ips 1ips 1ips 1ips 1ips 1ips 1ips 1ips 1ips 1ips 1ips 1ips 1ips 1ips 1ips 1ips 1ips 1ips 1ips 1ips 1ips 1ips 1ips 1ips 1ips 1ips EMR 1ips 1ips 1ips 1ips 1ips 1ips 1ips 1ips 1ips 1ips 1ips 1ips 1ips 1ips 1ips 1ips LIVE SUPER FINE FINE NORMAL EXTENDED v Perform the settings for each item. Item selection: Move the cursor using the arrows button (C D A B). Change the setting: Rotate the jog dial. Pop-up display of the setting item: Press the SET button when the setting item has the "SETUP" button next to the item name. Turning pages of the settings menu: When "PREV/ NEXT PAGE" is displayed on the bottom of the settings menu, move the cursor to the "PREV/NEXT PAGE" using the arrows button, and then use the arrows button (A B) to turn the pages. Selecting a submenu again: Press the SET button. The cursor will be able to select a submenu again. x Select a main menu using the arrows button and press the SET button. [Screenshot 2] The submenu of the selected main menu will be displayed. b After completing the settings, press the SETUP/ESC button for 2 seconds or more to apply the settings. The SETUP MENU will be closed. → Live images will be displayed again. SETUP MENU Maintenance Switcher Recording Display Event Comm REC Setup Emergency REC I Recording I Power ON Manual REC I Manual Recording Channel I Embedded REC(Title) I Embedded REC(Time&Date) I REC Priority PRIORITY 1 2 3 I Audio Allocation AUDIO Audio1 Audio2 Audio3 Audio4 Schedule System LIVE ON OFF All ON ON REC MODE Manual REC Event REC Schedule REC CAMERA CAM1 CAM2 CAM3 CAM4 Important: If the settings are changed, all login users will be forcibly logged out. c Select the submenu using the arrows button (C D) and the press the SET button. When selecting the submenu by the cursor is enabled, press the SETUP/ESC button. The main menu can be selected. [Screenshot 3] The setting items will be displayed in the main area and the cursor will move to a setting item. SETUP MENU Maintenance Switcher Recording Display Event Comm Schedule System LIVE REC Setup Emergency REC I Resolution I Recording Time I Recording Rate and Quality FIELD 10s CAM1 CAM2 CAM3 CAM4 CAM5 CAM6 CAM7 CAM8 RATE 2.5ips 2.5ips 2.5ips 2.5ips 2.5ips 2.5ips 2.5ips 2.5ips Quality SFA CAM9 SFA CAM10 SFA CAM11 SFA CAM12 SFA CAM13 SFA CAM14 SFA CAM15 SFA CAM16 RATE 2.5ips 2.5ips 2.5ips 2.5ips 2.5ips 2.5ips 2.5ips 2.5ips I Auto Copy OFF Quality SFA SFA SFA SFA SFA SFA SFA SFA 93
-
 1
1 -
2
-
3
-
4
-
5
-
6
-
7
-
8
-
9
-
10
-
11
-
12
-
13
-
14
-
15
-
16
-
17
-
18
-
19
-
20
-
21
-
22
-
23
-
24
-
25
-
26
-
27
-
28
-
29
-
30
-
31
-
32
-
33
-
34
-
35
-
36
-
37
-
38
-
39
-
40
-
41
-
42
-
43
-
44
-
45
-
46
-
47
-
48
-
49
-
50
-
51
-
52
-
53
-
54
-
55
-
56
-
57
-
58
-
59
-
60
-
61
-
62
-
63
-
64
-
65
-
66
-
67
-
68
-
69
-
70
-
71
-
72
-
73
-
74
-
75
-
76
-
77
-
78
-
79
-
80
-
81
-
82
-
83
-
84
-
85
-
86
-
87
-
 88
88 -
 89
89 -
 90
90 -
 91
91 -
 92
92 -
 93
93 -
 94
94 -
 95
95 -
 96
96 -
 97
97 -
 98
98 -
99
-
100
-
101
-
102
-
103
-
104
-
105
-
106
-
107
-
108
-
109
-
110
-
111
-
112
-
113
-
114
-
115
-
116
-
117
-
118
-
119
-
120
-
121
-
122
-
123
-
124
-
125
-
126
-
127
-
128
-
129
-
130
-
131
-
132
-
133
-
134
-
135
-
136
-
137
-
138
-
139
-
140
-
141
-
142
-
143
-
144
-
145
-
146
-
147
-
148
-
149
-
150
-
151
-
152
-
153
-
154
-
155
-
156
-
157
-
158
-
159
-
160
-
161
-
162
-
163
-
164
 |
 |
