Panasonic WJHD316 WJHD309 User Guide - Page 91
Time & Date, RS232C Setup
 |
View all Panasonic WJHD316 manuals
Add to My Manuals
Save this manual to your list of manuals |
Page 91 highlights
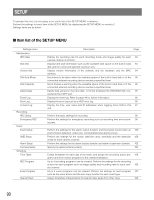
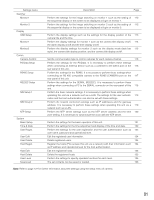
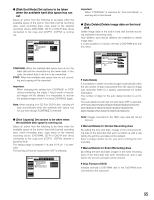
Settings menu Switcher Monitor1 Monitor 2 Display OSD Setup Monitor1 Monitor2 Comm Camera Control PS·Data Setup RS485 Setup RS232C Setup NW Setup 1 NW Setup 2 NTP Setup System Basic Setup Time & Date User Regist. User Edit User Delete Host Regist. Host Edit Host Delete User Level Save/Load Description Page Perform the settings for the image switching on monitor 1 such as the setting of 110 the sequential display or the screen to be displayed at login on monitor 1. Perform the settings for the image switching on monitor 2 such as the setting of 112 the sequential display or the screen to be displayed at login on monitor 2. Perform the display settings such as the settings for the display position of the 113 camera title and the time. Perform the display settings for monitor 1 such as the camera title display on/off, 114 the alarm display on/off and the time display on/off. Perform the display settings for monitor 2 such as the display mode (task bar 115 style), the camera title display position, and the camera title display on/off. Set the communication type to control cameras for each camera channel. 116 Perform the settings for the PS·Data. It is necessary to perform these settings when connecting an external device such as a controller to the DATA port on the 116 rear panel of this unit. Perform the settings for the RS485. It is necessary to perform these settings when connecting an RS 485 compatible camera to the RS485 (CAMERA) port on the 117 rear panel of this unit. Perform the settings for the SERIAL (RS232C). It is necessary to perform these settings when connecting a PC to the SERIAL connector on the rear panel of this 118 unit. Perform the basic network settings. It is necessary to perform these settings when operating this unit via a network such as a LAN. The settings for the user authenti- 119 cation and the host authentication can also be set with these settings. Perform the network connection settings such as IP addresses and the gateway address. It is necessary to perform these settings when operating this unit via a 119 network such as a LAN. Perform the NTP server settings such as the NTP server address and the time 120 zone setting. It is necessary to synchronize the clock with the NTP server. Perform the settings for the basic operation of this unit. 121 Perform the settings for the time adjustment and display of the time and date. 122 Perform the settings for the user registration and the user authentication such as 123 user name, password and operational level. Edit the registered user information. 124 Delete registered users. 124 Register the hosts (PCs access this unit via a network) with their information such 124 as IP address and operational level for the host authentication. Edit the registered hosts. 125 Delete the registered hosts. 125 Perform the settings to specify operable functions for each level. 125 The set contents can be saved or loaded. 126 Note: Refer to page 127 for further information about the settings using the setup menu of camera. 91
-
 1
1 -
2
-
3
-
4
-
5
-
6
-
7
-
8
-
9
-
10
-
11
-
12
-
13
-
14
-
15
-
16
-
17
-
18
-
19
-
20
-
21
-
22
-
23
-
24
-
25
-
26
-
27
-
28
-
29
-
30
-
31
-
32
-
33
-
34
-
35
-
36
-
37
-
38
-
39
-
40
-
41
-
42
-
43
-
44
-
45
-
46
-
47
-
48
-
49
-
50
-
51
-
52
-
53
-
54
-
55
-
56
-
57
-
58
-
59
-
60
-
61
-
62
-
63
-
64
-
65
-
66
-
67
-
68
-
69
-
70
-
71
-
72
-
73
-
74
-
75
-
76
-
77
-
78
-
79
-
80
-
81
-
82
-
83
-
84
-
85
-
 86
86 -
 87
87 -
 88
88 -
 89
89 -
 90
90 -
 91
91 -
 92
92 -
 93
93 -
 94
94 -
 95
95 -
 96
96 -
97
-
98
-
99
-
100
-
101
-
102
-
103
-
104
-
105
-
106
-
107
-
108
-
109
-
110
-
111
-
112
-
113
-
114
-
115
-
116
-
117
-
118
-
119
-
120
-
121
-
122
-
123
-
124
-
125
-
126
-
127
-
128
-
129
-
130
-
131
-
132
-
133
-
134
-
135
-
136
-
137
-
138
-
139
-
140
-
141
-
142
-
143
-
144
-
145
-
146
-
147
-
148
-
149
-
150
-
151
-
152
-
153
-
154
-
155
-
156
-
157
-
158
-
159
-
160
-
161
-
162
-
163
-
164
 |
 |
