Pantech Flex Download PDF - Page 61
Using the Camera, Before Using, Taking Pictures
 |
View all Pantech Flex manuals
Add to My Manuals
Save this manual to your list of manuals |
Page 61 highlights
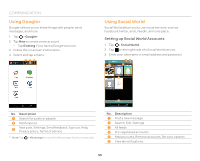
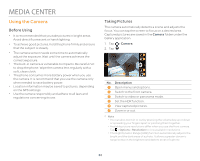
MEDIA CENTER Using the Camera Before Using x It is recommended that you take pictures in bright areas. Avoid direct fluorescent or harsh lighting. x To achieve good pictures, hold the phone firmly and ensure that the subject is steady. x The camera sensor needs some time to automatically adjust the exposure. Wait until the camera achieves the correct exposure. x The built-in camera is vulnerable to impacts. Be careful not to drop the phone. Wipe the camera lens regularly with a soft, clean cloth. x The phone consumes more battery power when you use the camera. It is recommend that you use the camera only when needed to save battery power. x Location information may be saved to pictures, depending on the GPS settings. x Use the camera responsibly and adhere to all laws and regulations concerning its use. Taking Pictures The camera automatically detects a scene and adjusts the focus. You can tap the screen to focus on a desired area. Captured pictures are saved in the Camera folder under the Gallery application. 1. Tap > Camera. 2. Tap . 2 3 1 4 6 5 No. Description 1 Open menus and options. 2 Switch to the front camera. 3 Switch to video or panorama mode. 4 Set the HDR function. 5 View captured pictures. 6 Zoom in or out. Note x You can also zoom in or out by pressing the volume key up or down or spreading your fingers apart or pinching them together. x Available picture resolutions differ when you use the front camera. Tap > Options > Resolution to view available resolutions. x The High Dynamic Range (HDR) function automatically adjusts the bright and the dark areas of a photo. It allows a greater dynamic range between the brightest and darkest areas of a photo. 61
-
 1
1 -
2
-
3
-
4
-
5
-
6
-
7
-
8
-
9
-
10
-
11
-
12
-
13
-
14
-
15
-
16
-
17
-
18
-
19
-
20
-
21
-
22
-
23
-
24
-
25
-
26
-
27
-
28
-
29
-
30
-
31
-
32
-
33
-
34
-
35
-
36
-
37
-
38
-
39
-
40
-
41
-
42
-
43
-
44
-
45
-
46
-
47
-
48
-
49
-
50
-
51
-
52
-
53
-
54
-
55
-
 56
56 -
 57
57 -
 58
58 -
 59
59 -
 60
60 -
 61
61 -
 62
62 -
 63
63 -
 64
64 -
 65
65 -
 66
66 -
67
-
68
-
69
-
70
-
71
-
72
-
73
-
74
-
75
-
76
-
77
-
78
-
79
-
80
-
81
-
82
-
83
-
84
-
85
-
86
-
87
-
88
-
89
-
90
-
91
-
92
-
93
-
94
-
95
-
96
-
97
-
98
-
99
-
100
-
101
-
102
-
103
-
104
-
105
-
106
-
107
-
108
 |
 |
