Pfaff creative 4874 Owner's Manual - Page 140
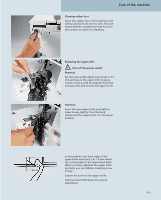
Changing the light bulb, Turn off the power switch, Tighten the upper knife
 |
View all Pfaff creative 4874 manuals
Add to My Manuals
Save this manual to your list of manuals |
Page 140 highlights
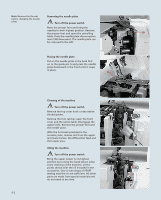
Note: If the upper knife is tightened, the seam width cannot be altered. Tighten the upper knife Turn off the power switch Before sewing particularly heavy fabrics, it is advisable to tighten the upper knife (35). Raise the needle(s) to its/their highest position and open the swivelling table. Tighten the screw A fully with the allen A key. When you have finished sewing heavy fabrics, you must always slightly loosen this screw again. Changing the light bulb Turn off the power switch Remove the detachable thread stand (27). Use the screwdriver from the accessories box to remove the screw for the sewing light cover (25). Remove the sewing light cover. Push the bulb as far as it will go into the socket. This will force pin A slightly upwards. Twist the bulb half a turn in A counterclockwise direction and pull it out. Insert the new bulb (no more than 12V, max. 5W) in the socket and twist in clockwise direction until it is fully seated. Replace the sewing light cover and tighten the screw. 9-4
-
 1
1 -
2
-
3
-
4
-
5
-
6
-
7
-
8
-
9
-
10
-
11
-
12
-
13
-
14
-
15
-
16
-
17
-
18
-
19
-
20
-
21
-
22
-
23
-
24
-
25
-
26
-
27
-
28
-
29
-
30
-
31
-
32
-
33
-
34
-
35
-
36
-
37
-
38
-
39
-
40
-
41
-
42
-
43
-
44
-
45
-
46
-
47
-
48
-
49
-
50
-
51
-
52
-
53
-
54
-
55
-
56
-
57
-
58
-
59
-
60
-
61
-
62
-
63
-
64
-
65
-
66
-
67
-
68
-
69
-
70
-
71
-
72
-
73
-
74
-
75
-
76
-
77
-
78
-
79
-
80
-
81
-
82
-
83
-
84
-
85
-
86
-
87
-
88
-
89
-
90
-
91
-
92
-
93
-
94
-
95
-
96
-
97
-
98
-
99
-
100
-
101
-
102
-
103
-
104
-
105
-
106
-
107
-
108
-
109
-
110
-
111
-
112
-
113
-
114
-
115
-
116
-
117
-
118
-
119
-
120
-
121
-
122
-
123
-
124
-
125
-
126
-
127
-
128
-
129
-
130
-
131
-
132
-
133
-
134
-
 135
135 -
 136
136 -
 137
137 -
 138
138 -
 139
139 -
 140
140 -
 141
141 -
 142
142 -
 143
143 -
 144
144
 |
 |
