Pfaff creative 4874 Owner's Manual - Page 22
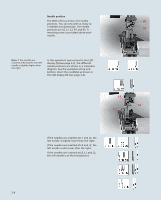
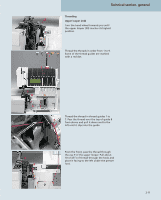
positions are L0, L1, L2, R1 and R2.
 |
View all Pfaff creative 4874 manuals
Add to My Manuals
Save this manual to your list of manuals |
Page 22 highlights
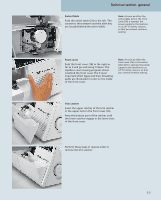
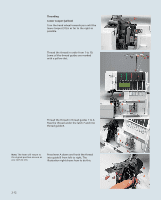
Needle position The 4874 offers a choice of 5 needle R1 positions. You can sew with as many as 3 needles simultaneously. The needle positions are L0, L1, L2, R1 and R2. A R2 retaining screw is provided above each needle. Note: If the needles are inserted at R2 and R1, the left needle is slightly higher than the right. In this operator's manual and in the LCD display (9) (see page 3-2), the different needle positions are shown in a schematic diagram. See the examples at top and bottom. Insert the needle(s) as shown in the LCD display (9) (see page 3-2). L1 L2 L0 If the needles are inserted at L1 and L2, the left needle is slightly lower than the right. If the needles are inserted at L0 and L2, the left needle is also lower than the right. If the needles are inserted at L0, L1 and L2, the left needle is at the lowest point. 2-8
-
 1
1 -
2
-
3
-
4
-
5
-
6
-
7
-
8
-
9
-
10
-
11
-
12
-
13
-
14
-
15
-
16
-
 17
17 -
 18
18 -
 19
19 -
 20
20 -
 21
21 -
 22
22 -
 23
23 -
 24
24 -
 25
25 -
 26
26 -
 27
27 -
28
-
29
-
30
-
31
-
32
-
33
-
34
-
35
-
36
-
37
-
38
-
39
-
40
-
41
-
42
-
43
-
44
-
45
-
46
-
47
-
48
-
49
-
50
-
51
-
52
-
53
-
54
-
55
-
56
-
57
-
58
-
59
-
60
-
61
-
62
-
63
-
64
-
65
-
66
-
67
-
68
-
69
-
70
-
71
-
72
-
73
-
74
-
75
-
76
-
77
-
78
-
79
-
80
-
81
-
82
-
83
-
84
-
85
-
86
-
87
-
88
-
89
-
90
-
91
-
92
-
93
-
94
-
95
-
96
-
97
-
98
-
99
-
100
-
101
-
102
-
103
-
104
-
105
-
106
-
107
-
108
-
109
-
110
-
111
-
112
-
113
-
114
-
115
-
116
-
117
-
118
-
119
-
120
-
121
-
122
-
123
-
124
-
125
-
126
-
127
-
128
-
129
-
130
-
131
-
132
-
133
-
134
-
135
-
136
-
137
-
138
-
139
-
140
-
141
-
142
-
143
-
144
 |
 |
